


Add gravel, buy a pretty pot with one drainage hole, and water a little and often. That's the popular advice, and it's a reliable way to keep a fiddle leaf fig too wet. Good fiddle leaf fig pot drainage isn't about making water run out as fast as possible. It's an air-and-water balance, where excess water leaves after every watering, the mix holds some moisture between drinks, and air returns to the pores around the roots. More drainage isn't automatically better, and a layer of rocks at the bottom can make the root zone wetter.
Pot Drainage Verdicts for Common Setups
A fiddle leaf fig pot drains well when it has four to six unobstructed bottom holes and the mix inside can release water freely. That one rule lets you judge most setups before you buy, drill, or repot.
| Setup | Drainage verdict | Why it matters |
|---|---|---|
| Plastic nursery pot with 4-6 unobstructed holes | Works well | Matches the extension baseline and lets runoff leave the root zone |
| Decorative pot with no drainage hole | Fails as a standalone container | Water pools around the roots with no exit |
| Decorative pot with one small hole | Usually too restrictive | A single small outlet clogs and slows runoff |
| Nursery pot inside a cachepot | Works only if runoff is emptied | Standing water in the outer pot can reach the root zone |
| Any pot with gravel under the mix | Does not improve drainage | Water can collect just above the rock layer |
| Oversized pot with dense peat-based mix | Stays wet too long | Slow drying leaves less air around the roots |
Most problems here start with the container, not your watering can. A plant can be in the brightest corner and on a sensible schedule and still decline because water has nowhere to go, or because a large volume of dense mix stays saturated far longer than the roots can use it.
The 30 Second Check
Turn the pot over and count the openings. Push a pencil through each one to confirm it's clear, then check after watering whether the base sits in water in its saucer or outer pot. If you find one blocked pinhole or a pool under the pot, you've found the issue in under a minute.
Practical rule: A decorative pot that fails the count can stay as a sleeve, but the plant itself belongs in a draining container.
Keep setups marked works well, fix the restrictive ones, and treat a no-hole pot as decoration only. Don't try to compensate for a sealed container by watering in sips. That leaves the center of the root ball dry while the bottom stays trapped and wet.
How to Choose and Modify a Pot That Drains
Start with the baseline from the Penn State Extension Adams County Master Gardener guidance, which recommends an inexpensive plastic nursery pot with four to six drainage holes paired with fast-draining potting soil. The same guidance notes North Carolina Cooperative Extension classifies the species as preferring moist, well-drained, loamy, acidic soil and as sensitive to overwatering. That number isn't a universal engineering standard, since hole size, pot depth, substrate texture, and watering volume all matter, but it's a concrete target when you're shopping or drilling.
Choose or Modify the Pot
- Count and map the holes. Turn the pot over, count existing openings, and mark new ones spread across the base rather than clustered in the center. Spreading them lets the whole bottom drain, not one low spot.
- Check the size. Holes should be wide enough for runoff to pass freely but small enough to keep mix in. A single small opening is the most common failure, because one root or a bit of bark can plug it.
- Drill glazed ceramic slowly. Use a masonry or diamond bit, keep it wet, use light pressure, and brace the pot so it can't wobble. Rushing cracks the glaze and can split the base.
- Cover lightly, if at all. A square of mesh or a single shard over an oversized hole stops soil loss without sealing the outlet. Don't stack shards until the hole is mostly blocked.
- Size up modestly. Pick a container only a few centimetres wider than the root ball. Favour a taller pot over a shallow, wide one, since taller containers generally hold less water after watering.
- Test before potting. Pour water through the empty pot with mix and watch the runoff. Water should start exiting promptly and clear steadily, not pool on the surface.
Say you have a glazed pot with a single pinhole. It can stay soggy for days because that one outlet clogs, while the same pot with four drilled holes clears in minutes. If a pot fails the pour test after modification, I'd keep it for decoration rather than fight it.
Our guide to how to choose the right pot for your plants covers material and sizing trade-offs if you're starting from scratch. A saucer should catch runoff, not hold the pot in standing water. Accumulated water keeps the lower root zone saturated even when the container technically has drainage holes.
Why Gravel at the Bottom Hurts and What to Use Instead
Gravel does not make water drain faster. It can leave the mix around the roots wetter by moving the saturated zone higher in the pot.
The U.S. Forest Service container guidance explains that gravity moves water down through container media and out through bottom drainage holes. The holes need to let water escape while limiting the loss of growing medium. A separate gravel layer works against that flow: water does not readily pass from fine potting mix into much coarser material, so it can collect above the boundary.
The result is a shallower column of usable mix and a wet zone closer to the roots. Drainage is about balancing air and water throughout the pot, not making runoff as fast as possible.
Build Drainage Into the Whole Mix
Use a uniform, coarse-textured mix from top to bottom. A practical starting recipe for a fiddle leaf fig is:
- Two parts indoor potting mix: Holds moisture and nutrients and gives roots a fine-textured medium to grow into.
- One part perlite: Adds air space that helps the mix drain without staying waterlogged.
- One part orchid bark or pumice: Bark adds structure and helps resist compaction. Pumice holds some water in its pores and releases it gradually.
Adjust the proportions to the plant's conditions. A large plant in bright light can use a little more potting mix. In lower light, keep the coarse fraction generous because the mix will dry more slowly.
If the pot already has gravel, remove the root ball when the mix is slightly damp, shake off the gravel, and repot at the same depth in a uniform mix. Even a thin gravel layer creates a fine-to-coarse boundary.
A mesh screen over a drainage hole lets water pass while keeping mix in place. A single shard over an oversized hole can also limit soil loss, as long as it does not block most of the opening. Avoid a thick layer of gravel or stacked shards at the outlet.
Water Fully and Keep Decorative Pots Dry-Footed
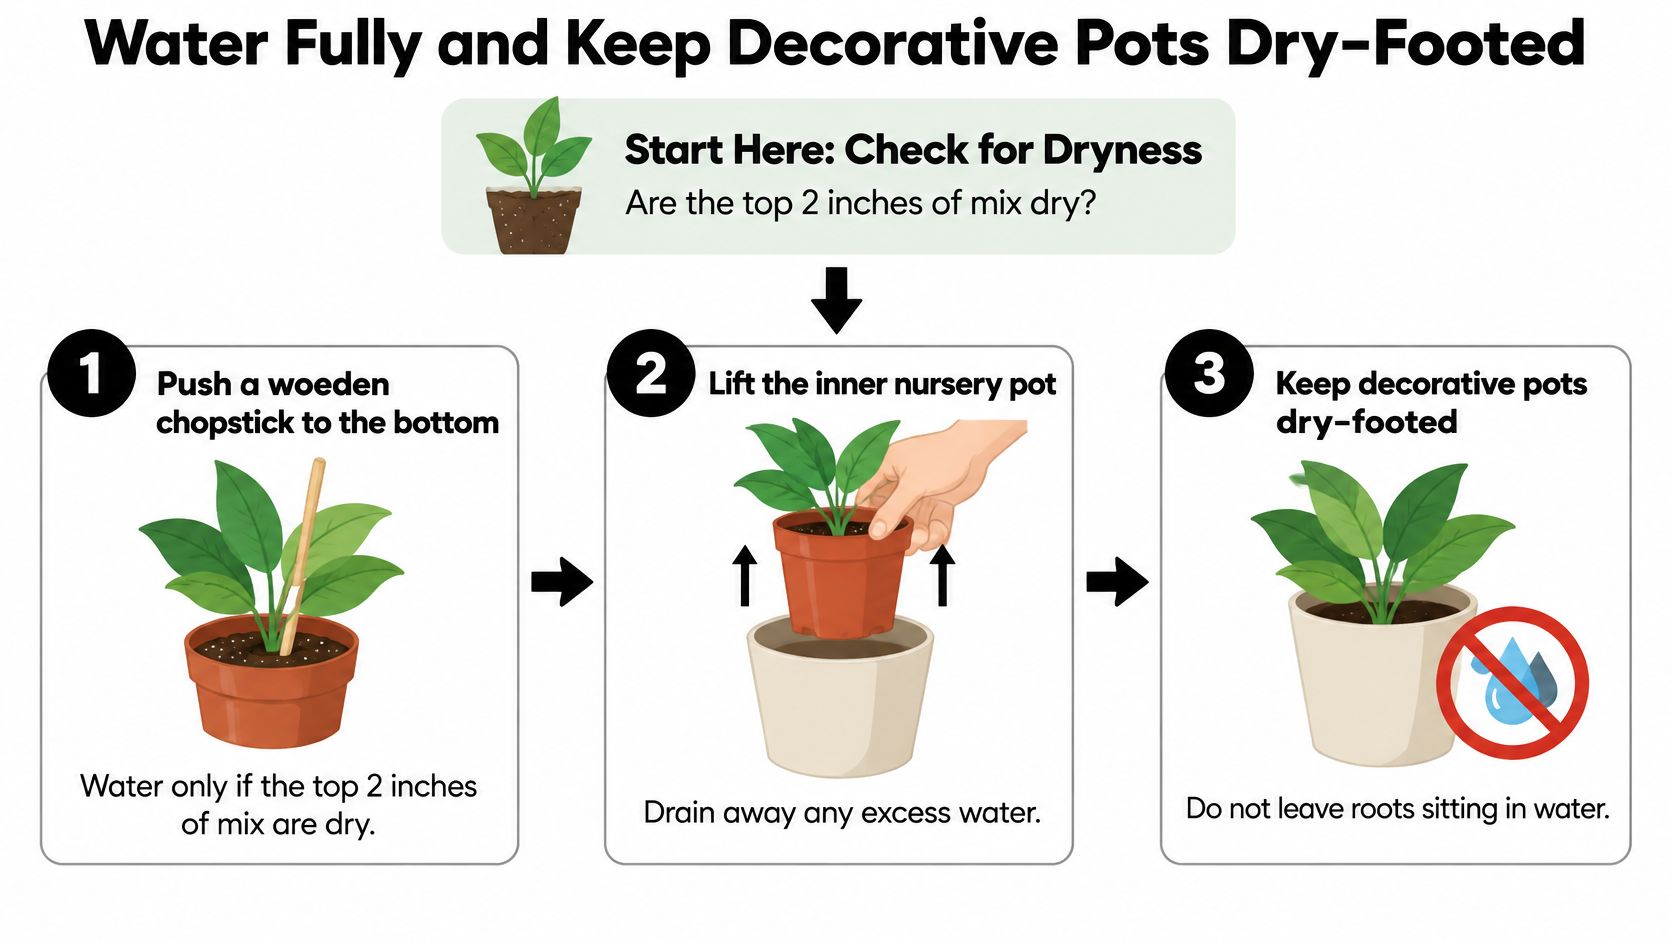
Fast runoff is not the goal. A fiddle leaf fig needs a thorough soak, then enough air in the mix for roots to breathe. Let water leave through the drainage holes, and keep the pot out of its own runoff.
The routine below works indoors with a sink, tray, or shower base where the pot can drain.
The Watering Routine
- Check dryness first. Push a wooden chopstick to the bottom and water when the top 2 inches of mix are dry. West Virginia Extension's houseplant care guidance recommends watering after the upper 2 inches of medium have dried. Adjust the interval for light, temperature, pot material, and root mass.
- Lift out the inner pot. Carry the nursery pot to a sink or tray. Watering inside a decorative outer pot hides runoff and makes it harder to check whether the base is standing in water.
- Water slowly and fully. Pour over the surface until water exits the bottom holes. Leave about 3/4 inch of space at the top to prevent water from spilling over the rim. A slow pour gives dry areas time to absorb water instead of letting it rush through gaps.
- Let it drain and empty the runoff. Allow the pot to drain for about 15 minutes, then discard the runoff and empty the saucer or outer pot within 15 minutes of watering. Never pour runoff back into the pot.
- Return the plant and note the date. A phone reminder is more reliable than guessing when you last watered.
The New York Botanical Garden's fiddle leaf fig guide recommends watering until water exits the bottom, checking after 15 minutes, and removing runoff. It also warns that decorative containers without drain holes are a common starting point for fiddle leaf fig problems. NC State Extension recommends double-potting when an attractive container lacks drainage and explains that rocks do not replace a drainage hole.
Why Each Step Matters
A full soak wets the root ball more evenly than a small pour. In a dense root ball, the center can remain dry while the surface looks wet. Thorough watering also carries accumulated salts out through the holes.
The wait between waterings matters as much as the soak. Saturated pores contain too little oxygen for root respiration. Roots need water to drain and air to return to the spaces between mix particles. Watering again before the upper mix has dried can keep the lower root zone wet for too long.
Runoff needs to leave the setup, not just the pot. A nursery pot sitting in a full cachepot leaves its lower roots surrounded by water, despite having drainage holes.
Use Weight When You Can't Judge Visually
Lift the pot after watering and again once it has drained. A saturated pot feels noticeably heavier; it gets lighter as the mix dries. This check helps when a tall plant is hard to inspect or a cachepot hides the inner pot. Pot feet and risers can raise the inner pot above stray runoff, but they are not a reason to leave water standing.
Temporary wetness after a thorough soak is normal. Mix that remains saturated for several days can point to dense mix, an oversized pot, or runoff left beneath the plant.
Use a decorative pot without a drainage hole as a sleeve around a draining nursery pot, not as the growing container. Let the dryness check, rather than a fixed calendar, guide watering because light and weather affect how quickly the mix dries.
Cachepot Clearance Details
Leave enough room around the nursery pot to lift it out easily. If it fits so tightly that you stop removing it, you may also stop checking for trapped water. After returning the plant, tilt the cachepot or look inside with a phone light. Pour out any water you find.
Pay attention to how the runoff slows. A stream that turns to drips within a few minutes is different from water that pools on the surface or a pot that stays heavy for days. Those signs point to a mix or pot-size problem, not a need to change the watering schedule.
Drainage Symptoms and Fixes That Work
Water running straight down the inside wall and out while the center stays dry is the symptom people misread most often. It looks like great drainage. It isn't. The mix has dried so severely that it's become hydrophobic and has pulled away from the pot, so water channels through the gap instead of penetrating.
The Purdue Extension container media guide notes that drainage should be judged by total porosity, container capacity, air space after irrigation, and bulk density, and that taller containers generally drain more and retain less water than short containers. It advises loosening a hydrophobic mix with a chopstick or fork before watering, then irrigating in multiple passes until drainage begins. A structurally stable, coarse-textured mix that you don't compact will keep more of that air space after each watering.
| Symptom | Likely cause | Fix |
|---|---|---|
| Water runs down the pot wall and out the top gap | Hydrophobic mix after severe drying | Loosen with a chopstick or fork, then water in several passes |
| Soil still wet a week after watering | Dense mix or oversized pot | Repot into a smaller pot with a coarse, uniform mix |
| Water pools above a layer in the pot | Gravel or rock beneath the mix | Remove the layer and repot into uniform mix |
| Musty smell with soft brown roots | Saturated, low-oxygen root zone | Unpot, trim rotted roots, repot into fresh mix in a draining pot |
| Lower leaves yellow over damp soil | Overwatering | Lengthen the interval and check the top 2 inches before watering |
| Water stands in the saucer after watering | Runoff not emptied | Empty the saucer within 15 minutes of watering |
One Cycle Fixes Versus Repot Fixes
Loosening a hydrophobic surface, emptying a saucer, and pausing watering until the top dries are one watering cycle fixes. You should see better penetration and a lighter pot within days. If loosening doesn't help because the whole root ball has shrunk, water in several slow passes ten minutes apart so the mix can re-wet gradually.
Rot, a dense mix in an oversized pot, and a gravel layer need a repot. Waiting won't change the physics inside the container. Our step-by-step guide on how to save an overwatered fiddle leaf fig plant walks through trimming soft brown roots and judging what's still firm and viable.
Give any fix two watering cycles before judging it, unless you smell rot. A musty smell means you shouldn't wait for cycle two. Unpot now, cut away rotted roots with clean scissors, and reset the plant in fresh mix.
Repot Your Fiddle Leaf Fig Into a Draining Setup
If the current setup stays wet, repot into a draining one rather than adjusting the watering can around it. The sequence below keeps stress low and avoids compacting the new mix.
The visual checklist sums up the first key moves before you start.
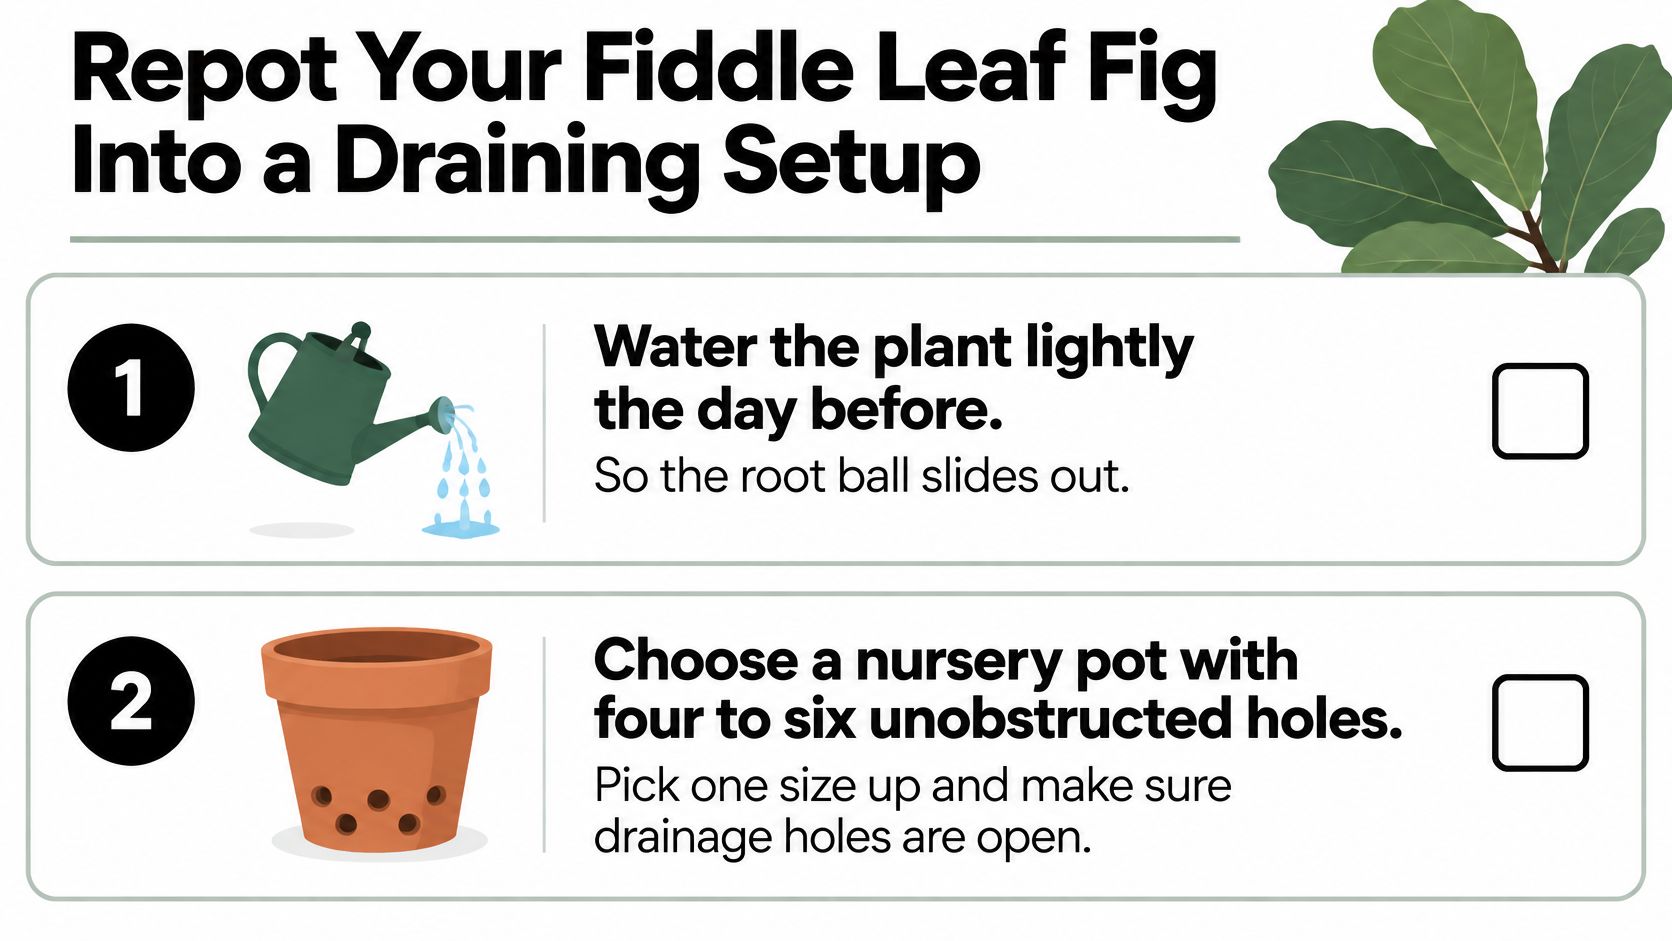
- Water lightly the day before. A slightly damp root ball slides out more cleanly than a bone dry or saturated one.
- Choose the right nursery pot. Pick one size up, only a few centimetres wider than the root ball, with four to six unobstructed holes.
- Add mesh over each hole. Use a small square per opening to keep mix in without sealing the outlet.
- Set the depth. Add a base of coarse, uniform mix, set the root ball at its original depth, and leave about 3/4 inch of headspace below the rim. If you prefer not to blend your own, our Premium Fiddle Leaf Fig and House Plant Soil All Purpose Blend is pre-mixed and sold in 2.2 and 8.2 dry quart sizes for $18.47 USD.
- Fill and firm lightly. Work mix around the roots with a chopstick to remove large pockets, but don't pack it down hard. Compaction destroys the air space you just built.
- Water to settle. Water slowly until runoff exits the bottom, let it drain, and empty the saucer within 15 minutes.
- Pause before the next check. Wait 24 hours, then feel the top 2 inches before deciding on the next watering.
Watch the technique in action before your first attempt if you're handling a tall, top-heavy plant.
A plant that has been sitting wet shouldn't wait for the next ideal season. I'd repot it now, because every extra week in a saturated pot costs roots you can't get back. Make one change this week, whether that's counting the holes, emptying the saucer on time, or doing the repot.
Get your fiddle leaf fig into a pot that drains and a coarse, uniform mix that lets air back in after watering, and the rest of its care gets much easier. At Leaves & Soul you'll find the pre-mixed fiddle leaf fig soil and plant foods to support that setup, along with professional soils and fertilizers for bonsai, houseplants, succulents, and orchids. Visit us to choose the right blend for your plant and start your next watering cycle with a pot that works with you, not against you.