


Your plant looks a little off. The leaves aren't exactly failing, but growth has slowed, watering feels harder to get right, and the pot it came in suddenly seems too small or too decorative to trust. That's usually when people grab the next larger pot and a bag of generic mix, then hope for the best.
That approach works sometimes. It also causes a lot of avoidable root problems.
The best way to learn how to repot indoor plants is to stop treating repotting like a routine pot upgrade. Healthy repotting starts with diagnosis. Some plants need more room. Some need old soil removed. Some need damaged roots cleaned up. Some are perfectly fine where they are, but the cache pot or dense mix is what's creating trouble.
Is It Time to Repot Your Houseplant
A plant doesn't need repotting just because it's been a while. It needs repotting when the roots, soil, or container are getting in the way of healthy growth.
Penn State notes that key signs include stalled growth, becoming top-heavy, drying out too quickly, or showing a salty crust on the soil surface. In salty conditions, it advises replacing as much of the old soil as possible, which is a very different fix from moving into a larger pot (Penn State Extension on repotting houseplants).
Check the plant before the pot
The container is often the initial focus. I'd rather look at the plant's behavior.
Use this quick diagnostic:
- Growth has stalled: If the plant is in active season but hasn't pushed new growth in a while, roots or exhausted media may be part of the problem.
- Watering has become extreme: If the mix dries almost immediately, roots may be occupying most of the pot. If it stays wet too long, the mix may be compacted or poorly matched to the plant.
- The plant leans or tips: Top-heavy plants often need more root support, not just more water.
- There's crust on the soil surface: White or yellowish crust often points to mineral or fertilizer salt buildup.
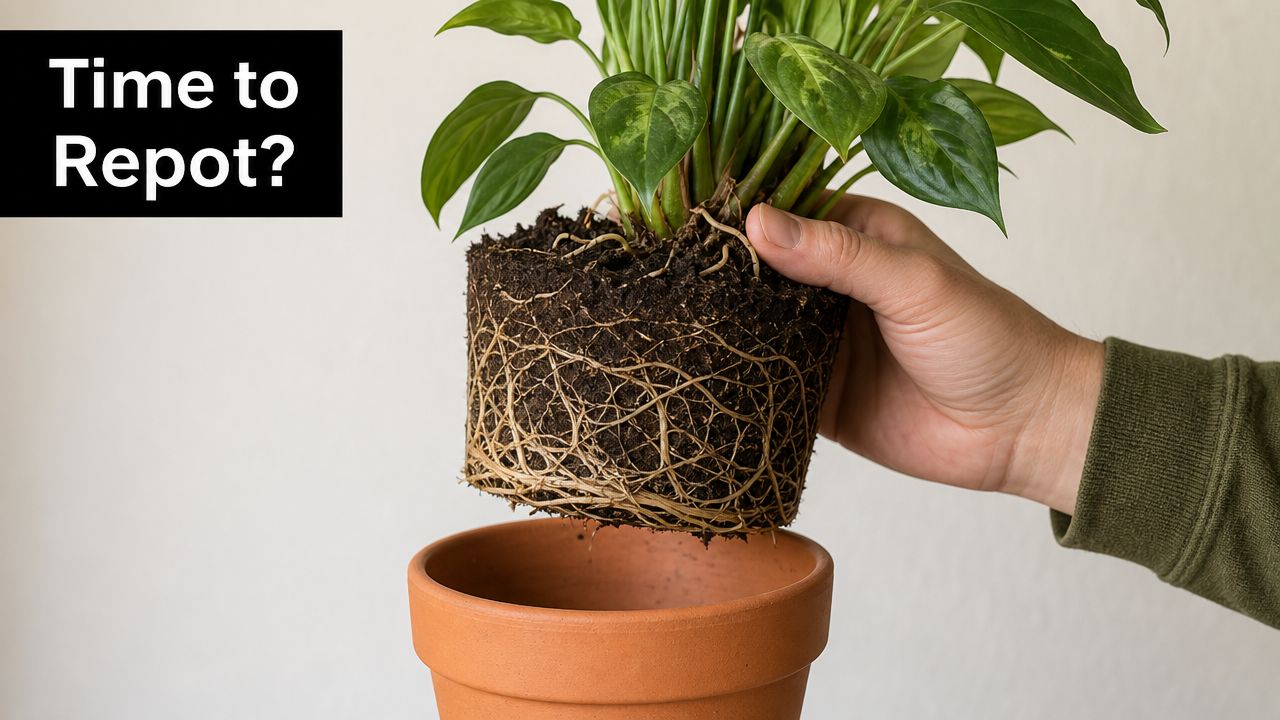
If you suspect the plant is rootbound, it helps to understand what that looks like before you disturb it. This guide to what a rootbound plant is gives a useful visual baseline.
Practical rule: A bigger pot solves a space problem. It does not solve bad soil, salt buildup, or root damage.
What the root ball is telling you
Slide the plant out only if you can do it without forcing it. You're looking for patterns, not perfection.
A plant that needs a simple up-pot usually has a firm root ball with roots circling the edge but still looks healthy. A plant that needs more intervention often shows sour-smelling mix, mushy sections, dead roots, or compacted soil that no longer accepts water evenly.
Here's the distinction that matters most:
| What you see | What it usually means | Better response |
|---|---|---|
| Dense but healthy roots circling the pot | The plant has run out of room | Up-pot and loosen roots |
| Salty crust on top of soil | Fertilizer or mineral buildup | Replace as much old soil as possible |
| Soil dries unusually fast | Root mass may be crowding the pot | Inspect roots, then up-pot if needed |
| Plant is unstable or top-heavy | Root zone may no longer anchor growth well | Repot for balance and support |
| Wet, degraded, or foul-smelling mix | Media breakdown or root stress | Soil reset and root cleanup |
When not to repot
If the plant is putting on healthy growth, watering is stable, and the root ball still has room, leave it alone. Disturbing roots just because the calendar says so is one of the easiest ways to create stress that wasn't there before.
Repot because the plant needs it. Not because the shelf looks due for a project.
Choosing the Right Pot and Soil Mix
A plant can look overdue for repotting and still fail in the wrong setup. I see it often in the shop. The roots were healthy enough, but the plant got dropped into a pot that stayed wet too long, or into a decorative container with no exit for water.
Pot choice sets the watering pattern. Soil choice sets the air supply around the roots. Get those two right, and repotting becomes much less risky.
Pot size is a control, not a reward
A slightly larger pot is usually the right move. Jumping from a cramped nursery pot into something much wider gives you extra wet soil around a root ball that cannot use it yet. That is how healthy roots end up sitting in cold, stagnant mix.
For most houseplants, go up one pot size. If the current pot is 6 inches, move to 7 or 8 inches, not 10. The exception is a plant with a damaged root system. In that case, I often keep the pot size the same and replace the failing mix instead of giving the plant more soil to struggle through.
Pot material changes how forgiving the setup will be
The same pothos can behave very differently in plastic versus clay. One holds moisture longer. The other sheds it faster through the pot wall. Neither is better by default.
- Plastic pots: Light, affordable, and slower to dry. Useful for tropical plants, smaller pots, and anyone whose home runs dry or warm.
- Unglazed clay pots: Faster drying and more breathable. Better for succulents, cacti, and growers who know they tend to overwater.
- Glazed ceramic pots: Heavier and better for tall or top-heavy plants. Moisture retention varies, so drainage matters more than looks.
- Decorative cache pots: Fine as outer covers. Use them with an inner grow pot that has drainage.
Swansons Nursery notes two practical details that are easy to miss. Unglazed clay may need soaking before use so it does not pull moisture from fresh potting mix, and decorative cache pots work best with an inner pot that has drainage (Swansons guide to repotting by container type).
A drainage hole is not optional for most indoor plants. If a pot has no drainage, it needs to function as a cover pot, not the planted container.
Soil mix should match the diagnosis
This article is not built around a one-mix-fits-all formula because that is where indoor plant advice often goes wrong. If the plant was struggling before repotting, copying a generic bagged mix can keep the original problem in place.
Compacted soil needs more air. A plant that dries out too fast may need a mix that holds moisture more evenly. Epiphytes such as orchids need open media around the roots, not dense potting soil. Bonsai need a shallow, stable mix that lets you water precisely without collapsing around fine roots.
If you want a clearer breakdown by plant category, this guide to the best soil for indoor plants is a useful reference.
Match the mix to the plant
Use this as a starting point, then adjust for your watering habits and the pot you chose.
| Plant type | What the roots need | What usually works better |
|---|---|---|
| Tropical houseplants | Even moisture with airflow | A loose indoor mix with drainage support |
| Fiddle leaf figs | Aeration and steady moisture, not soggy roots | Chunkier, well-draining houseplant mix |
| Succulents and cacti | Fast drying and high air space | Gritty mix that won't stay dense |
| Orchids | Open structure around roots | Bark- or moss-based orchid media |
| Bonsai | Stability, airflow, and precise watering control | Aggregate-heavy bonsai media |
One more trade-off matters here. Decorative pots and trendy soil blends can look great on a shelf, but roots respond to air, moisture, and temperature, not styling. Choose the setup that fits the plant first. Then make it look good around that.
A Gentle Guide to Repotting Your Plant
Repotting should feel controlled, not rushed. If you find yourself yanking stems, crushing the root ball, or packing the pot tight, stop and reset.
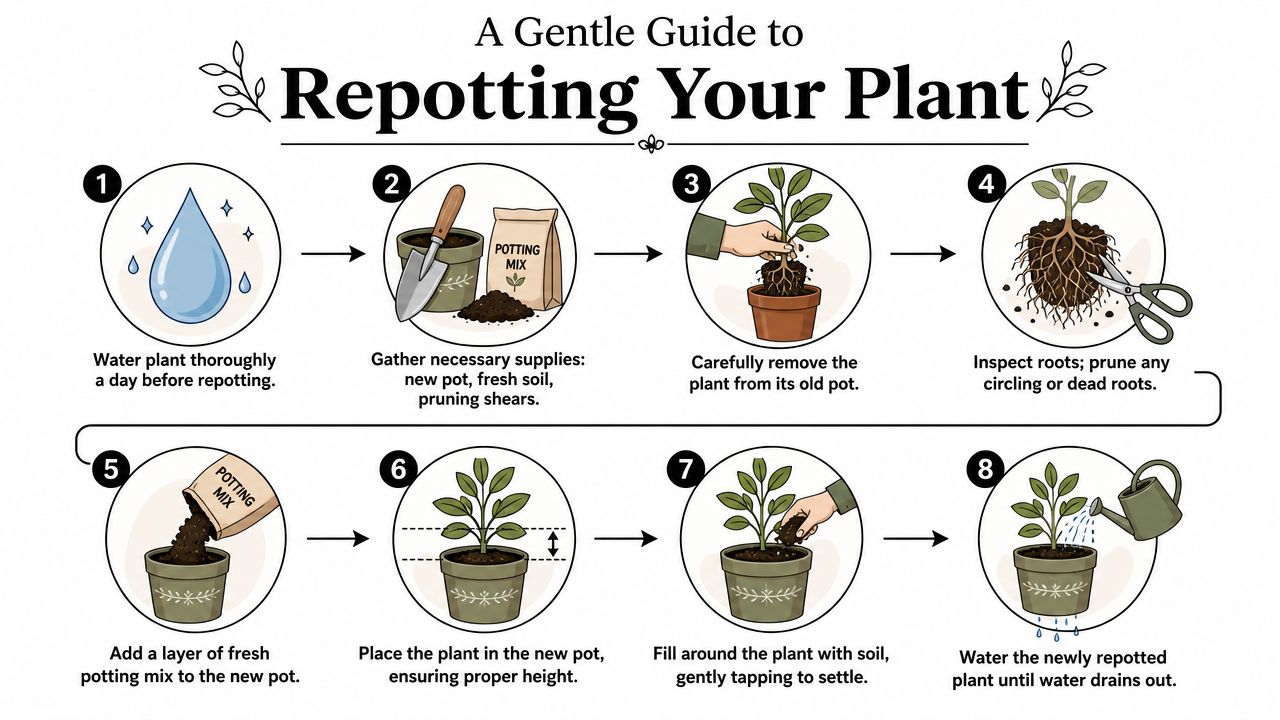
Mahoney's recommends watering the plant a few hours to a day before repotting so the root ball slides out more cleanly and transplant shock is reduced (Mahoney's guide to fall repotting houseplants).
Start with prep that reduces stress
Before you touch the plant, gather what you need:
- A correctly sized pot: Clean, with drainage.
- Fresh media: Matched to the plant, not just whatever bag is open.
- Pruners or scissors: Clean enough for root work.
- A small scoop or trowel: Helpful for backfilling without smashing roots.
- A protected workspace: Repotting is neater when you expect mess.
If you're reusing containers or tools, sanitize them first. This walkthrough on how to sterilize pots and tools without bleach is useful if you want a cleaner setup without harsh residue.
The actual repotting sequence
The Sill's repotting guide recommends a workflow that's both simple and solid: gently tease apart circling roots, discard about one-third of the old potting mix, keep the crown at the same height as before, and water thoroughly to remove air pockets and bring soil into contact with roots (The Sill's plant care repotting method).
Here's how that looks in practice.
-
Remove the plant gently
Tip the pot, support the base of the plant, and ease the root ball out. If it's stuck, tap the pot sides or squeeze a plastic nursery pot. Pulling by the stem is how people snap healthy growth. -
Inspect the roots
Healthy roots are usually firm. Badly stressed roots may be mushy, brittle, or discolored. Circling roots need to be loosened so they'll grow outward instead of continuing to coil. -
Tease, don't shred
Work your fingers around the lower and outer root ball. Loosen the tightest areas first. You're opening paths for new growth, not combing every root clean. -
Remove some exhausted mix
Old media often breaks down, compacts, or accumulates salts. Getting rid of a portion of it gives roots access to fresher structure and better airflow.
This visual walkthrough is helpful if you want to see the flow before trying it yourself.
Root pruning and planting height
Some plants only need loosening. A severely root-bound plant may need selective pruning.
The Sill notes that on a badly root-bound plant, you can in some cases trim up to a quarter of the roots without killing it if the remaining root mass is healthy, but that's not routine maintenance. It's a corrective move for a plant that has become densely pot-bound and can't expand properly.
If you trim roots, keep the cuts purposeful. Remove what's dead, circling hard, or clearly blocking new growth. Don't turn a healthy root system into a haircut.
When you set the plant into the new pot, keep the crown at the same height as before. Burying the crown too deep can create moisture problems around the stem base. Planting too high leaves roots exposed and unstable.
Backfill without compacting
Add mix around the root ball in small amounts. Tap or settle the pot as you go so large air pockets disappear, but don't ram the soil down hard. Roots need oxygen as much as they need moisture.
Then water thoroughly. This final watering does more than hydrate the plant. It settles the mix around the roots and reveals whether drainage is working the way it should.
A repotted plant should feel secure in the pot, centered, and at the same planting depth it had before. If it wobbles badly, the issue is usually poor backfilling or too much empty space around the root ball.
Repotting Tricks for Specific Plant Types
The basic process stays the same. The details don't.
A pothos, a bonsai juniper, a phalaenopsis orchid, and a fiddle leaf fig can all suffer from repotting done “correctly” but with the wrong medium, container, or aftercare. The smartest way to repot is to respect the kind of root system you're working with.
Bonsai needs precision, not spare room
Bonsai isn't about giving roots more space. It's about maintaining a balanced root system in a shallow container.
That means a standard fluffy houseplant mix usually isn't the best match. Bonsai roots generally do better in a gritty, open medium that supports airflow and stable watering. When repotting bonsai, growers often do deliberate root pruning, then position the tree carefully in a shallow ceramic pot so it sits with intention rather than wobbling loose in the center.
A heavy glazed bonsai pot can help with stability. If you're using unglazed clay, remember that fresh clay can pull moisture from the media, so soaking the pot beforehand can help, as noted earlier.
Orchids need media, not potting soil
Orchids confuse a lot of otherwise skilled plant owners because they don't behave like ordinary potted plants.
If you move an orchid from bark into standard indoor potting mix, the roots often lose the air space they rely on. Orchid roots usually want an open medium such as bark or moss, and many also produce aerial roots that shouldn't be forced downward just to make the pot look tidy.
With orchids, repotting is less about a bigger pot and more about refreshing broken-down media. If the bark has decomposed and stays wet too long, that alone can justify a repot.
Succulents and cacti punish soggy decisions
Succulents and cacti don't want a rich, moisture-retentive blend around their roots. After repotting, the biggest risk is often keeping them too wet in a pot that dries too slowly.
Use a gritty mix. Use a pot that doesn't trap water. Handle the roots carefully, especially if the plant has been overwatered in the past and has fragile sections.
What doesn't work is treating a succulent like a tropical foliage plant. The same watering rhythm won't translate.
Fiddle leaf figs need restraint
Fiddle leaf figs are a good example of why oversized pots cause problems. People see a large canopy and assume it needs a much larger container. In practice, those roots often respond better to a measured move and a more aerated mix.
If a fiddle is dropping lower leaves, staying wet too long, or sulking after watering changes, look at the root zone before blaming light alone. Dense media and decorative pots without proper drainage are common issues.
Container choice changes by plant type
The same container can help one plant and hurt another.
- Cache pot plus inner nursery pot: Good for many houseplants because you keep drainage while getting the decorative look.
- Shallow ceramic bonsai pot: Right for bonsai, but only with suitable bonsai media and secure placement.
- Unglazed clay pot: Useful when you want faster drying. Less useful for plants that need a steadier moisture level.
- Standard orchid pot or slotted inner pot: Better for orchids that benefit from root airflow.
The common thread is simple. Match the container and medium to the plant's natural needs, not to what looks nicest empty on a shelf.
Aftercare and Troubleshooting Common Repotting Issues
Repotting doesn't end when the last scoop of mix goes in. The recovery window is where most plants either settle in or slide backward.
Because the roots were disturbed, keep conditions steady. Don't repot and then immediately move the plant into harsher sun, colder drafts, or an aggressive feeding routine.
What to do right after repotting
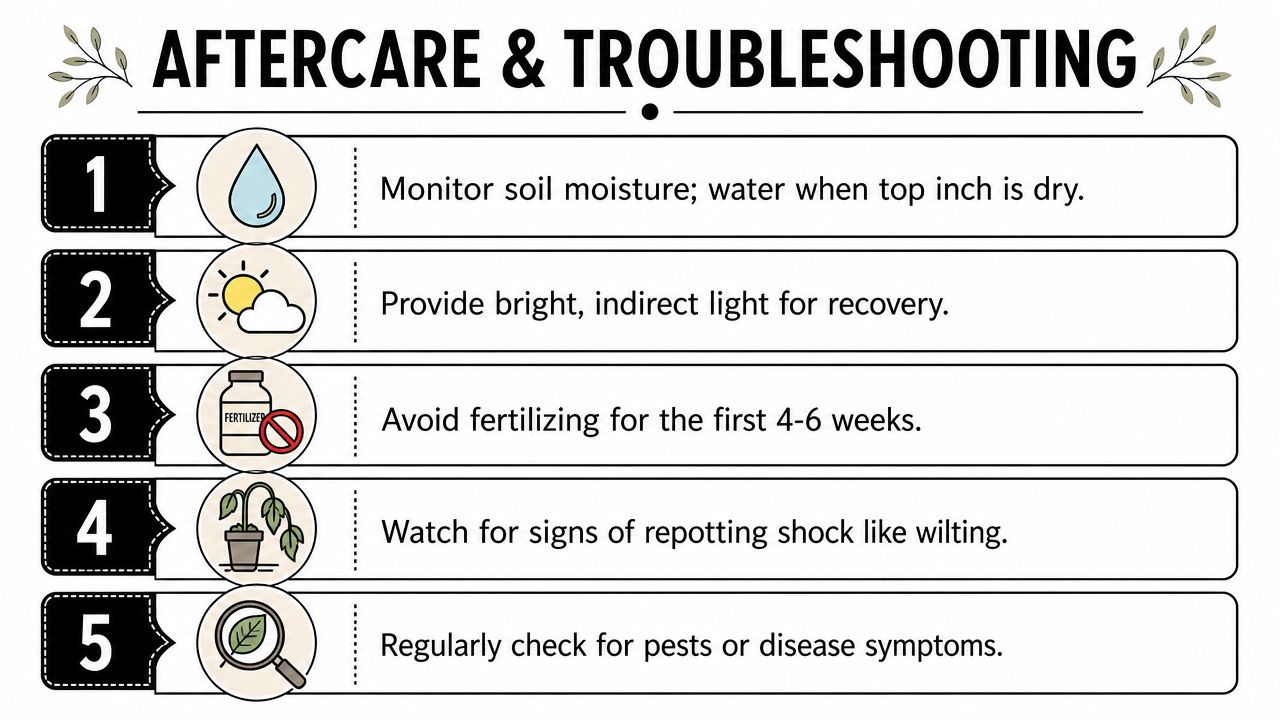
Keep the first week boring. That's good plant care.
- Give bright, appropriate light: Enough to support recovery, not enough to push extra stress.
- Water based on the new mix: Fresh media doesn't behave like exhausted media. Check moisture before repeating your old schedule.
- Leave the plant alone: Constant turning, moving, or checking the roots again only delays recovery.
- Watch the leaves, not just the soil: Droop, softness, and yellowing each suggest different problems.
Mahoney's points out that watering the plant the day before repotting helps keep roots hydrated through the process and reduces transplant shock, which is one reason gentle aftercare matters so much once the plant is back in its pot.
What's normal and what isn't
A little drooping can be normal. A full collapse usually isn't.
Use this quick troubleshooting guide:
| Symptom after repotting | More likely cause | Better response |
|---|---|---|
| Mild temporary wilt | Normal transplant stress | Keep care steady and avoid extra changes |
| Soil stays wet too long | Pot too large, poor drainage, or dense mix | Reduce watering and reassess root-zone conditions |
| Leaves yellow rapidly | Root stress or excess moisture | Check drainage and let the mix breathe |
| Plant feels loose in pot | Poor backfilling or unstable root ball | Add support and settle mix properly |
| No improvement after time | Root problem may be deeper than crowding | Inspect for rot, media breakdown, or hidden damage |
Newly repotted plants don't need more attention. They need better attention.
Fertilizer timing
Freshly disturbed roots are sensitive. Jumping in with strong fertilizer right away can make recovery harder, not easier.
Wait until the plant has settled and resumed active growth before feeding again. Once it's stable, a gentle slow-release option can be easier to manage than frequent heavy liquid feeding, especially for foliage plants that were repotted because the root zone needed a reset.
If the plant was struggling from salt buildup before repotting, be even more careful. The goal after a reset is stability, not speed.
Creating a Simple Repotting and Care Schedule
The plants that get into trouble fastest are usually the ones repotted on a fixed calendar without anyone checking the root zone first.
Use the calendar as a reminder, not a rule. Some indoor plants put on enough growth in a year to justify fresh mix or a pot change. Others sit happily in the same container for much longer, especially slower growers, compact bonsai, and orchids that prefer tighter root conditions than many decorative setups allow.
A better routine is one focused inspection during active growth, then a second quick check if watering behavior changes.
A practical yearly check
Pull the plant out of its cachepot or tray and review the whole setup, not just the leaves:
- Check new growth: Healthy, season-appropriate growth usually means the root system is still functioning well enough.
- Check watering pattern: If the mix dries out unusually fast, roots may have filled the pot. If it stays wet too long, the issue may be old media, a poor pot-to-plant match, or a decorative pot trapping moisture.
- Check the pot itself: Modern cover pots look good but often hide the underlying problem. No drainage, pooled runoff, or a nursery pot sitting in water can create symptoms that look like a repotting need when the appropriate fix is changing the container setup.
- Check the media surface and smell: Crusting, compaction, sour odor, or bark that has broken down point to a media problem, not always a size problem.
- Check stability: A top-heavy plant that rocks in the pot may need root work, a heavier container, or better anchoring rather than merely moving up a size.
That last point matters more than people expect. I see plenty of fiddle leaf figs, monsteras, and indoor trees brought into the shop for a "bigger pot" when what they instead need is a more stable base and a mix that dries at the right pace.
If you find one clear issue, match the solution to it. A rootbound pothos may benefit from a modest pot increase. A bonsai often needs pruning and reset work instead. An orchid with broken-down bark usually needs fresh media in a similar-sized pot, not extra room around the roots.
Write the check date on a plant tag, masking tape under the pot, or a note in your phone. Also note what you changed: larger pot, soil refresh, root trim, or no action. That small record helps you spot patterns, especially with plants in decorative containers where watering problems can mimic root problems.
If you want purpose-built soils, fertilizers, bonsai pots, and plant care supplies that make repotting easier to get right, take a look at Leaves & Soul. Their range is built for real indoor growers, from orchid hobbyists and succulent keepers to bonsai enthusiasts and fiddle leaf fig owners who need the right medium, not just a bigger pot.