


The most repeated outdoor feeding advice is "mix it stronger and feed every two weeks." That habit wastes liquid plant food for outdoor plants, burns roots, and sends dissolved nutrients past the root zone before plants can use them. Dose is not the number on the bottle alone. It is how much solution stays in moist soil, which depends on watering volume, runoff, and whether you drench, spray, or inject.
A stronger mix does not grow a stronger plant. It grows soft tissue, salt crust, and runoff. The useful approach is the opposite: pick an analysis that matches the setup, dilute to the labeled rate for that volume of soil, and stop the pour the moment water starts to leave the bed or the pot.
Pick the Right Liquid Food for Each Outdoor Setup
Every liquid food label carries three numbers, the N-P-K analysis. Nitrogen (N) drives leafy growth. Phosphorus, reported as phosphate (P₂O₅), supports energy transfer and reproductive development. Potassium, reported as potash (K₂O), supports water regulation and resilience. Read those numbers as emphasis. A larger figure does not mean the plant can use more of that nutrient at once.
USDA historical reporting found that nitrogen use increased 335% between 1940 and 1981 and reached 11.4 million tons in 1993, 55% of total commercial nutrient use. The same series recorded a drop in average corn nitrogen application from 140 pounds per acre in 1985 to 123 pounds per acre in 1993. Higher output did not require a stronger rate every year. Home beds work the same way: match the analysis to the plant, then measure how much solution the soil can hold before runoff begins.
Most outdoor plants run short of nitrogen more often than phosphorus. A high middle number is not automatically better for flowers or fruit. I would reach for a phosphorus-heavy formula only after a soil test or a clear deficiency points there. Acid-loving fruiting shrubs such as blueberry also need micronutrients, especially iron, in a formula meant for that group. Liquid food acts quickly, so trees and established shrubs want a low dose spread through the root zone, not a heavy pour at the trunk.
| Setup | Nutrient focus | What to check on the label |
|---|---|---|
| In-ground vegetable bed | Higher nitrogen early, balanced later | Balanced N-P-K with micronutrients, labeled for vegetables |
| Container herbs and annuals | Balanced N-P-K | Water-soluble concentrate with a clear rate for containers |
| Flowering shrubs | Moderate nitrogen, phosphorus only when needed | Formula matched to a soil test or visible deficiency |
| Fruiting shrubs such as blueberry | Balanced, with micronutrients | Formula labeled for acid-loving or fruiting shrubs |
| Established trees | Low dose placed in the root zone | Concentrate labeled for trees, with a stated dilution rate |
A four-point buying test
Before you pay, run this check:
- Match the setup. A vegetable formula is a poor default for an established tree, and a tree concentrate is too strong for a small herb pot.
- Read the emphasis. Early vegetables can take more nitrogen. Bloom does not justify a phosphorus spike by itself.
- Confirm outdoor use. The label should state a dilution rate and say whether the product is for soil drenching, foliar use, or both.
- Buy one season's worth. Opened concentrate loses usefulness if it sits through winter.
Container groups on a stand dry out faster than in-ground beds, so the rate on the bottle has to fit a small soil volume. If you are stacking pots, set drainage with these tiered planter assembly tips before mixing food, because each perched container changes how much solution can stay in the root zone. For a wider look at outdoor formulas, compare options in this guide to the best plant fertilizer for outdoor use.
Root Drench or Foliar Spray for Outdoor Plants
Roots take up most nutrients, so a root drench is the default for beds, containers, shrubs, and trees. Foliar spray and injector feeding earn a place only in narrower cases.
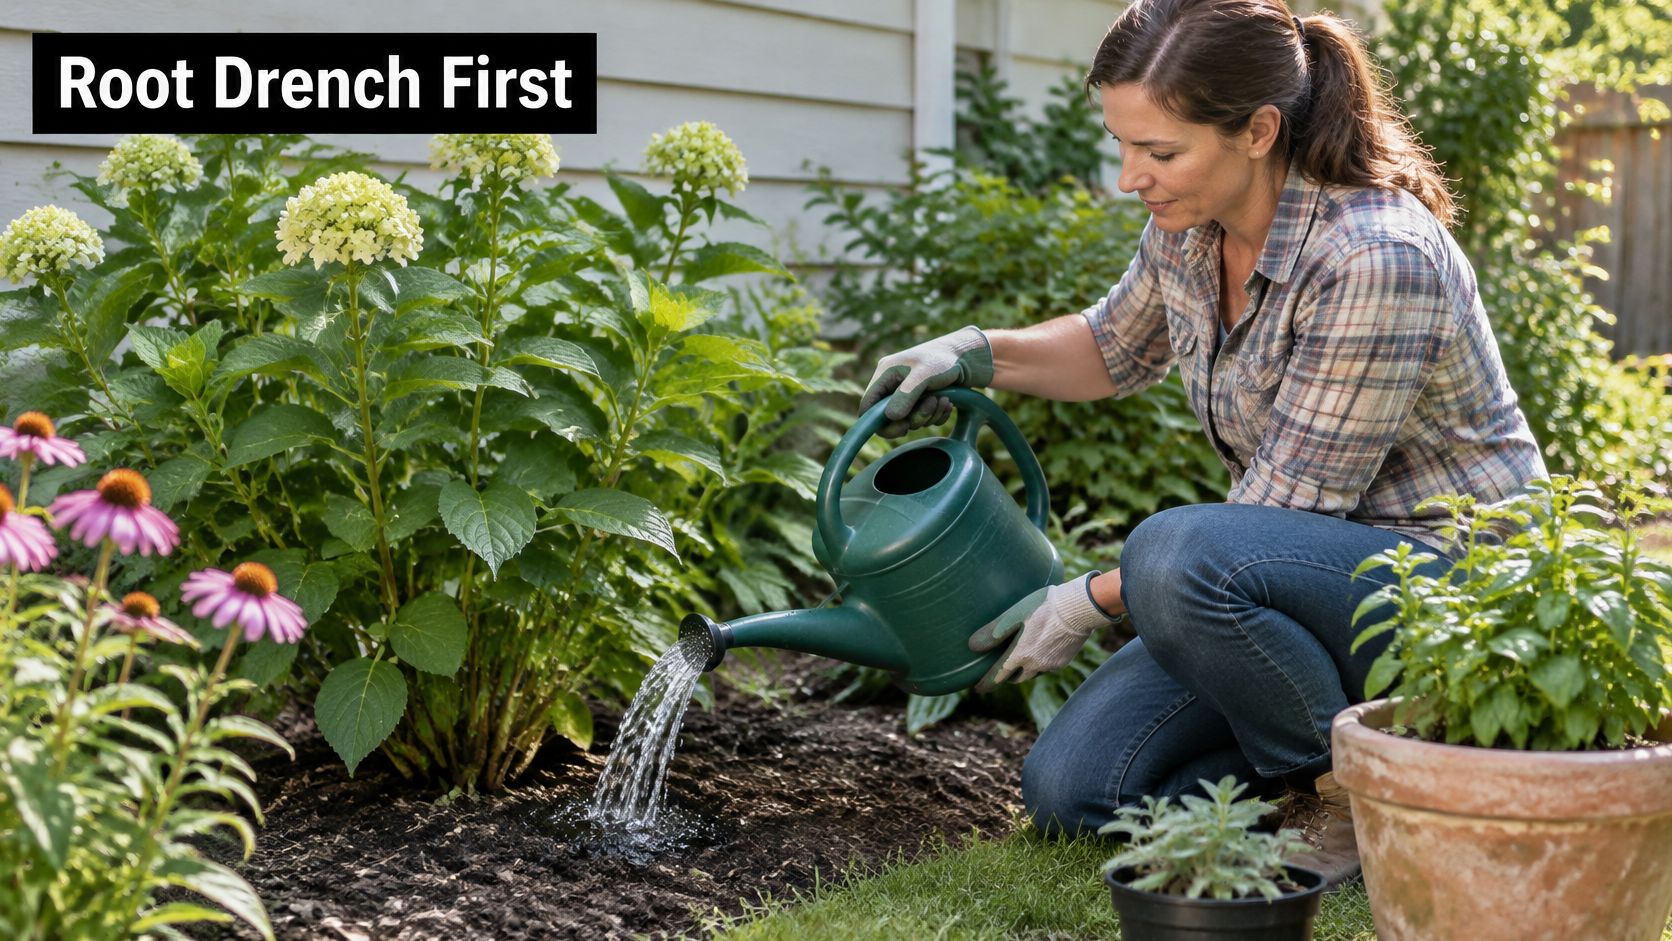
Pouring onto the root zone, as in that hydrangea drench, keeps the solution where uptake happens. Spraying the canopy does not replace that step.
| Method | Best for | Main risk |
|---|---|---|
| Root drench | In-ground beds, containers, shrubs and trees | Runoff and salt build-up when soil is dry or already saturated |
| Foliar spray | Quick fix for a visible micronutrient deficiency, if the label allows | Leaf burn in sun or heat, and poor uptake when wind carries the spray away |
| Drip or injector feeding | Container groups and raised beds on a timer | Overdelivery when the injector rate is not calibrated |
When each method wins
Foliar feeding suits a quick correction of a visible micronutrient problem, such as iron chlorosis on new leaves, and only when the label authorizes foliar use. Spray in cool early morning or evening, in low wind. Full sun and heat scorch wet leaves, and a breeze carries droplets off the plant.
Drip or injector feeding fits groups of containers on a timer. Calibrate the injector with plain water first. An uncalibrated unit overdelivers on every cycle, and you will not see the extra dose the way you see a heavy pour from a can.
Irrigation volume is the dose control. University of California research found that, even under favorable conditions, overhead irrigation may deliver only about 80% of water to containers, while roughly 20% lands on surrounding ground and can become runoff. Liquid food sent through that same overhead pattern misses roots and washes out of pots when you overwater. The method comparison in this note on fertilizer application methods is worth reading before you change hardware.
Practical rule: Feed already-moist root zones, skip the day before heavy rain, and stop when water drains freely from a pot or pools and runs off a bed.
If every plant shows the same pale new growth, test the soil before you spray. If one plant shows a specific mineral symptom and the label allows foliar use, a targeted spray can help that plant. Otherwise choose a root drench.
A short walk-through of mixing and placing a drench makes the volume point easier to see.
How to Dilute and Apply Liquid Food Step by Step
A sound outdoor protocol follows the 4R idea from USDA backyard nutrient guidance: confirm the need, pick an N-P-K that matches it, calculate the label rate for the actual bed or pot, apply during active growth, and place the solution at the root zone rather than on foliage. That same guidance says to apply liquid fertilizer to or around the plant base and to avoid contact with stems, leaves, and roots. The benchmark is zero visible runoff. If solution ponds or leaves the bed, you have passed infiltration capacity.
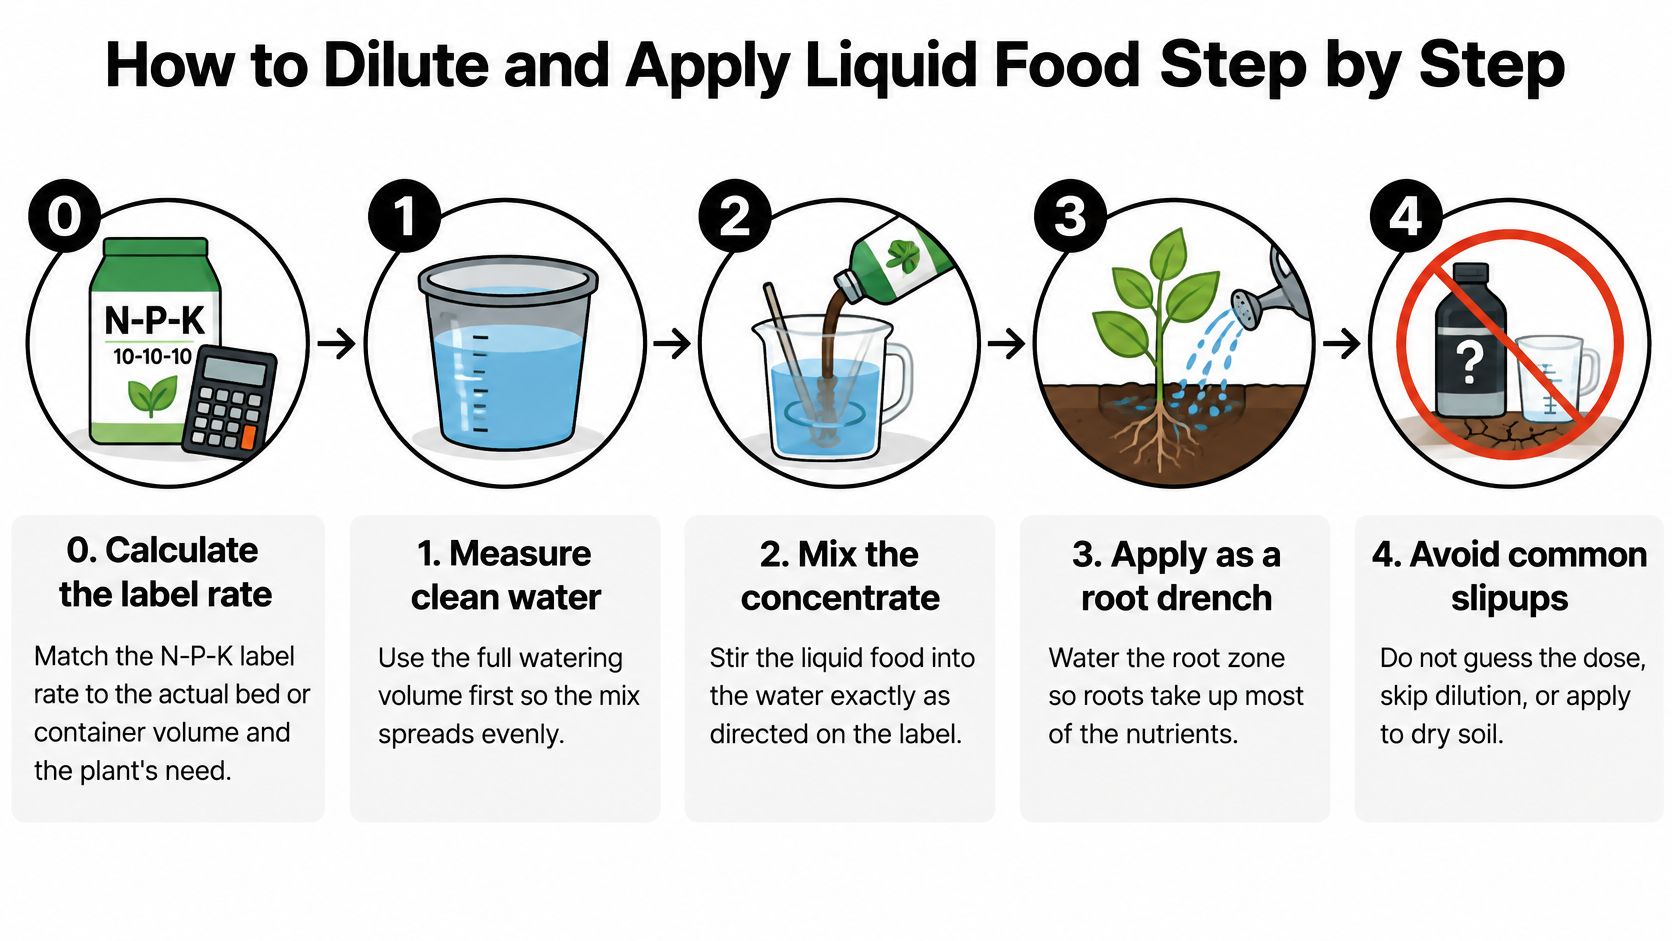
The drench, in order
- Calculate the label rate for the actual soil volume before you open the bottle. A 12-inch pot is not a 4-by-8 bed. Guessing "a capful" is the slip that burns small containers.
- Confirm active growth. Do not feed dormant or cold-stressed plants. Cold slows uptake, so the dose sits in the soil until rain moves it.
- Pre-wet dry soil with plain water a few hours ahead. Dry ground sheds solution the way a dry sponge sheds the first splash. Skip this and most of the food runs off the surface.
- Measure the concentrate with a graduated cup into a can of measured water. Never pour concentrate against a stem. Direct contact burns bark and crown tissue.
- Calibrate the can. Time how long it takes to pour a known volume, such as one quart. That timing is your dose, not a mental estimate of "about half the can."
- Pour slowly in a ring near the drip line or around the base, keeping solution off stems and leaves. A windy afternoon blows any mist past the bed, so pick a calm, cooler hour.
- Stop at the first pooling. Save the rest for a second pass on another day. Split doses track crop demand and cut leaching better than one heavy shot. Avoid the day before major rain, when dissolved nutrients move beyond the roots.
- Log the date, dilution, weather, and response. A notebook line beats trying to remember whether last Tuesday was full strength.
What a good week looks like
Over the next week, look for deeper green on new growth, steady turgor, and no scorched margins. Wilting right after a feed usually means the mix was strong or the soil was already wet. Pale color that does not change may mean the dose never stayed in the root zone, not that you need a richer bottle.
If water is leaving the bed, the application is finished, even if the can is not empty.
Feeding Schedules by Season and Plant Type
Intervals follow growth, not the calendar on the bottle. Feed while plants are putting on leaves, buds, or fruit. Stop before dormancy and before the first frost. In peak heat, containers need food less often, because frequent watering already flushes salts out of the small soil volume.
| Plant or setup | Season | Feed interval | Stop feeding |
|---|---|---|---|
| Annual vegetables in beds | Spring to mid-summer | Every 2 to 4 weeks | About 4 to 6 weeks before first frost |
| Container herbs and annuals | Spring to early autumn | Every 2 weeks at half label strength | When growth slows in late summer |
| Flowering shrubs | Bud break in spring and after bloom | Two feeds per year | Late summer |
| Fruit trees and citrus | Spring to early summer | Every 4 to 6 weeks | Mid-summer, before growth hardens off |
| Any plant in dormancy or cold stress | Late autumn to winter | None | Resume only when new growth appears |
Why those gaps exist
Bed vegetables can start about two to three weeks after transplanting, once roots have left the plug, then continue every two to four weeks through fruiting. Stopping four to six weeks before frost lets tissue harden instead of pushing soft leaves into cold.
Herbs and annuals in pots hold little soil, so half the label strength every two weeks is enough. Full strength on that schedule stacks salts between waterings. Watch your runoff here. If each watering sends a steady stream out the drainage holes, the pot is getting leached and the shorter interval makes sense. If water barely drains, the same schedule overdoses fast.
Flowering shrubs need one feed at bud break and one after bloom, then nothing. A late push of nitrogen grows leaves the shrub cannot harden before frost.
Fruit trees and citrus fit spring and early summer, on a four-to-six-week gap. Late-season nitrogen pushes soft shoots that winter injures.
Phosphorus is not a bloom switch
A big middle number does not automatically improve flowers or harvests. University of Maryland extension notes that nitrate is highly soluble and prone to runoff and leaching, and that nutrient levels can change quickly with weather and soil life. Related extension guidance adds that excess phosphorus and potassium can harm water quality, and that nitrogen is more commonly the limit in gardens. Phosphorus fertilizer is usually unnecessary on lawns, and any fertilizer type pollutes when it is misused.
Flowering plants do better on a balanced feed through bloom than on a phosphorus-heavy product started in early spring.
Use a soil test where you can. Skip extra phosphorus unless that test, or a real deficiency, says otherwise. Whatever interval you pick, the dose still rides on how much water you pour and where it goes, so a schedule on paper means little if half the solution runs past the roots. Cold-stressed or dormant plants get nothing until new growth resumes. Shift every date to your last frost and your own heat, not to a national chart.
Signs of Overfeeding and How to Fix Them
The usual failure is too much food, not a mix that is too weak. Excess nutrients impair growth and can move into groundwater or surface water. USDA conservation guidance requires liquid applications to stay within the soil's infiltration rate and water-holding capacity, with nutrients kept no deeper than the active rooting zone. That guidance also says to document micronutrient gaps with soil tests, tissue tests, plant symptoms, or crop-quality checks before you apply them.
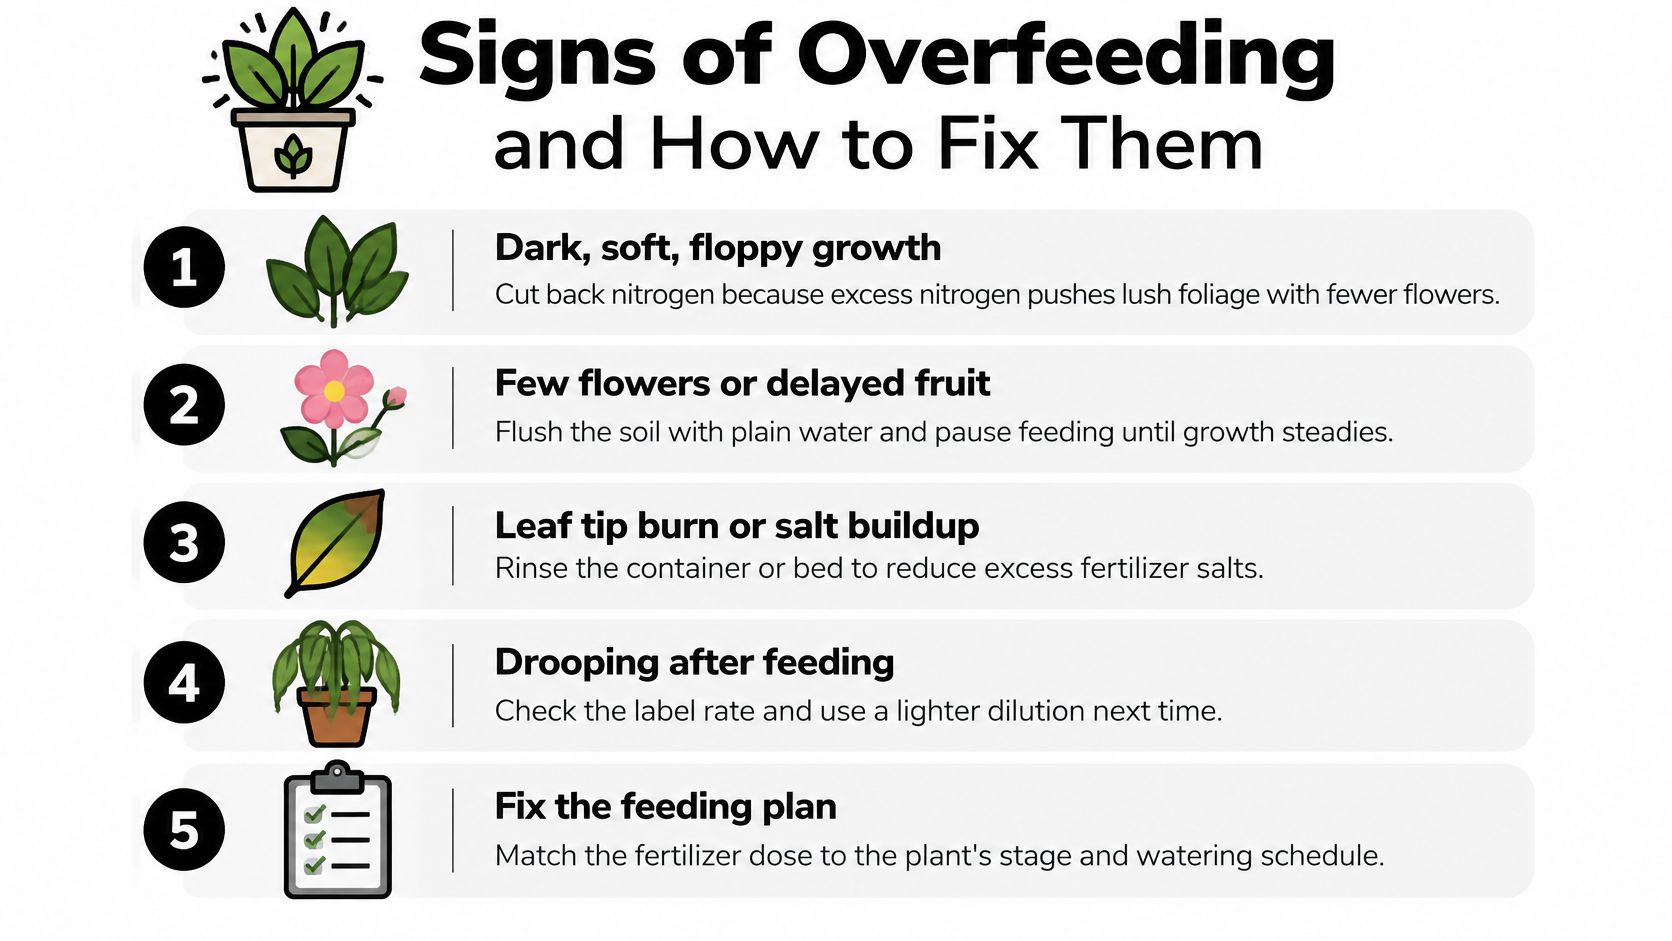
Excess nitrogen makes dark, soft, floppy growth with few flowers, delayed fruit, more pest and disease trouble, and more wind damage. The leaves look lush. The plant is not stronger.
| Symptom | Likely cause | Fix |
|---|---|---|
| Dark green, soft, floppy growth with few flowers | Too much nitrogen | Stop feeding, water deeply, then resume at half rate |
| Brown leaf edges or tips after feeding | Concentrate too strong, or spray on foliage | Flush with plain water and dilute more next time |
| Yellow lower leaves and slow growth | Nitrogen shortage or underwatering | Check soil moisture and test before adding more |
| Solution ponding or running off the bed | Application faster than the soil can absorb it | Split into smaller doses and feed moist soil |
| White crust or algae on container soil | Salt build-up from repeated feeding | Leach with plain water and refresh the top layer |
Recovery, then the quieter problem
For a salted container, flush with several volumes of plain water until drainage runs clear, pause feeding for two to three weeks, and come back at half strength. In a bed, one deep plain watering and a pause do the same job if you cannot leach the whole profile.
Underfeeding looks different and is less common: pale older leaves, slow new growth, small fruit. Water stress looks almost identical, so check moisture with a finger or a meter before you add food. A week of corrected care often shows in new leaves. Full recovery of a salted bed can take the rest of the season.
More detail on leaf patterns sits in this breakdown of signs of over-fertilizing plants.
A check before the next dose
Run four questions every time:
- Soil moisture. Is the root zone damp, not dust-dry and not soggy?
- Label rate. Did the last mix match the soil volume, or was it a guess?
- Last feed date. Has the interval for this plant type passed?
- Rain in the next two days. Heavy rain means wait.
Ponding is a symptom, not a finish line. Split what is left in the can. Also skip bare-soil broadcasting, feeding inactive plants, spraying foliage the label does not allow, and setting concentrate against roots. Where demand stretches across the season, split nitrogen hits the hungry weeks and is taken up more efficiently than one untimed slug.
A field habit that prevents most of these symptoms is simple. Calibrate the can or injector, calculate the nitrogen you are about to deliver, test the pattern with plain water, apply in cool low wind, watch for runoff, and write down date, dilution, weather, and what the plant did next.
Confirm Your Feeding Plan Before Your Next Watering
Write the plan before the hose comes out. Three actions are enough.
Pick the setup row that matches the bed, pot, shrub, or tree, and lock the nutrient focus to that row. Then lock the method and the dilution to the step list: root drench, measured water, labeled rate, stop at first runoff. Finally set the first date from the schedule for that plant, and write the stop date next to it so late-summer feeding does not sneak back in.

I would start with the cheapest fix, which is measuring the first dose and keeping a one-line log of date and response. Buy a liquid food that matches the setup, not the biggest bottle on the shelf.
Leaves & Soul is one option among several, not the only one. For flowering shrubs, the Crepe Myrtle, Hibiscus, Hydrangea, and Plumeria professional liquid fertilizers are 3-5-4 concentrates in 8 oz bottles. For trees, the Arbor Vitae, Banana, Blueberry, Citrus, and Evergreen concentrates use a 6-4-6 blend, and the Professional Evergreen Tree Fertilizer liquid concentrate is $9.99. Read those labels for dilution and outdoor use the same way you would read any other brand, then change the next feed from what the plant does and from any soil test you have.
Leaves & Soul carries liquid plant foods matched to outdoor shrubs, trees, and garden crops, so the N-P-K and dilution on the bottle can follow the setup you just planned. Use that label, your soil volume, and your log to keep each drench inside the root zone. Visit Leaves & Soul to compare those concentrates before your next watering.