


You brush past your bonsai and notice a patch of rust-brown foliage where the needles were recently blue-green. A few dry tips crumble between your fingers, and the immediate thought is uncomfortable: is my juniper bonsai dying?
Before you water, fertilize, prune, or repot, pause. Brown foliage is a symptom of a problem with water supply, roots, light, temperature, disease, pests, or normal seasonal change. The pattern matters more than the color alone. This calm bench-side check will help you decide whether your tree needs a simple adjustment or urgent intervention.
A Brown Juniper Is a Signal, Not a Verdict
A juniper can look alarming without being beyond recovery. Cold weather may deepen healthy foliage to bronze or purple, and some shaded inner needles may age and drop while the outer tips remain green. In other cases, a branch is dead, with brittle wood and no living tissue left.
The first task is to separate those situations instead of treating every brown patch as a watering emergency. Seasonal color change is usually distributed through foliage exposed to cold, while normal interior shedding tends to affect older growth hidden inside the canopy. True branch death is more localized. The affected shoot becomes dry, brittle, and unable to support green buds or flexible tissue.
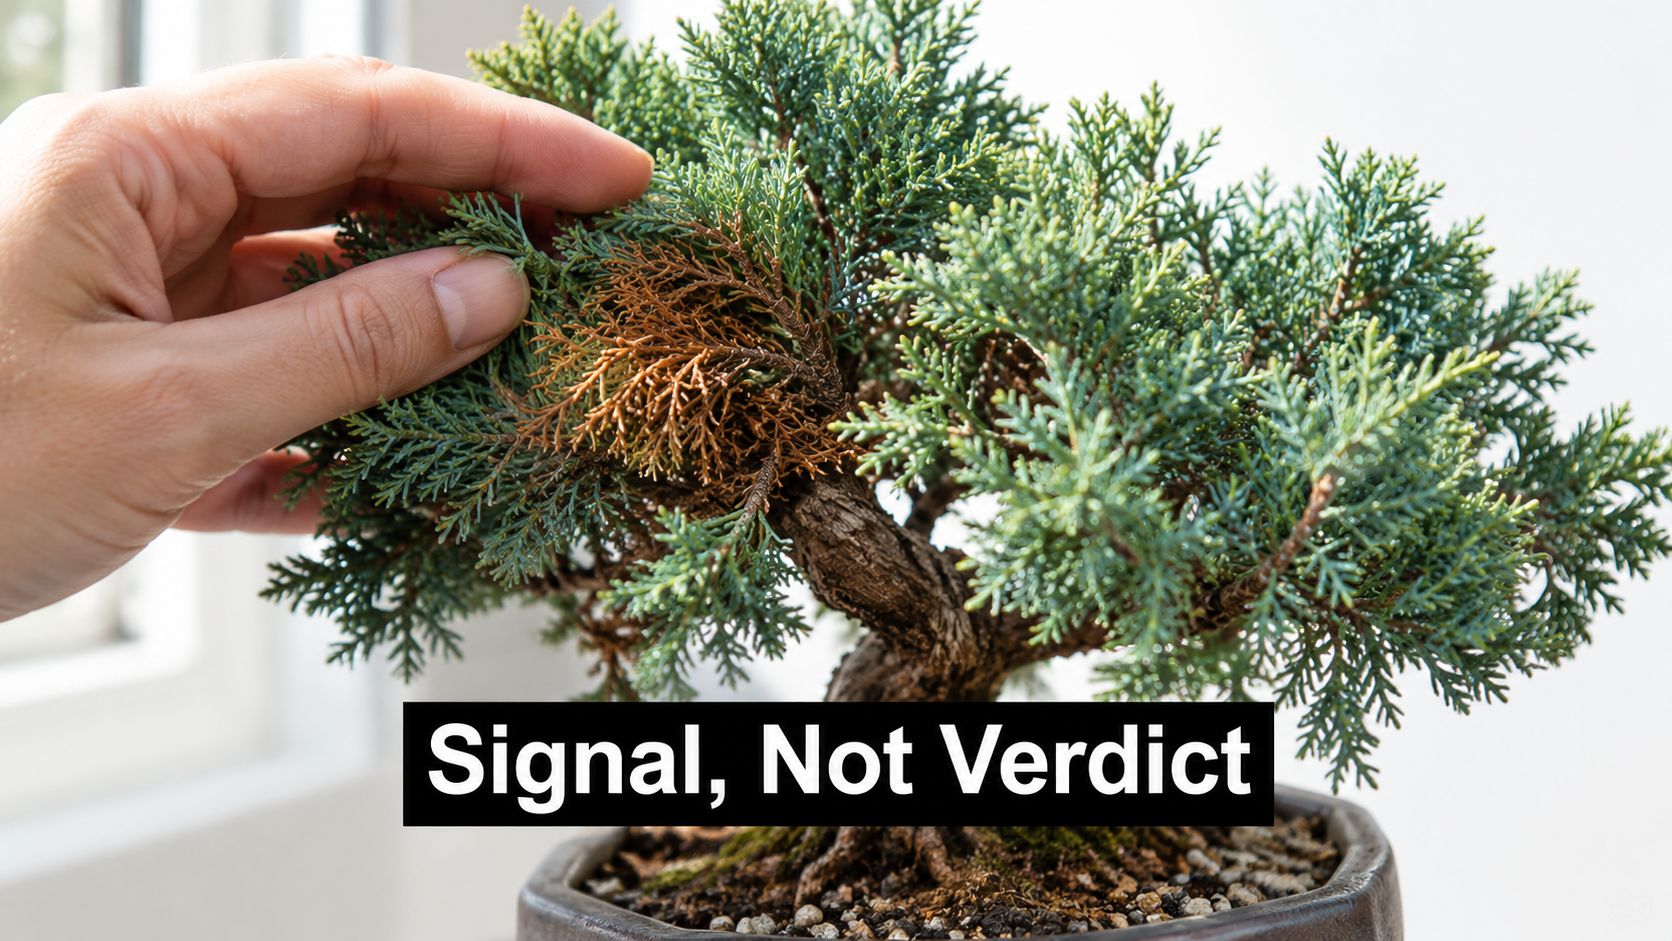
A quick living-tissue check
Use your fingers and a clean, sharp tool gently.
- Bend a small browned tip: Flexible tissue may still be alive. A brittle tip that snaps is more concerning.
- Inspect a small area of bark: A careful scratch can reveal green tissue beneath living bark. Brown, dry tissue beneath the scratch suggests that section has died.
- Trace the pattern: Browning at the outer tips points you toward drought stress, winter injury, or tip disease. Browning from lower branches or the interior may suggest root trouble, shading, or aging foliage.
- Look for surviving growth: Green buds and healthy, flexible branch tips are more useful recovery signs than old needles changing color.
Some junipers can develop a purplish-brown tone during frost as part of a cold-protection response, then green up again as spring returns, according to Bonsai Empire's juniper care guidance. That doesn't mean every brown tree is fine, but it does mean color alone can't answer the question.
Practical rule: Don't remove living-looking foliage simply because it has changed color. Confirm that the tissue is dead before making structural cuts.
The same cautious approach applies to trees and shrubs outdoors. If you're also dealing with broader evergreen concerns around your property, this guide for Terrigal homeowners offers useful context about diagnosing plant stress without jumping to a single cause. Your juniper's browning is a clue, not a verdict. The next check is the root zone, where water either reaches the foliage or fails to do so.
How Water Reaches the Foliage in a Bonsai Pot
Water must travel through three linked stages: the substrate holds it, fine roots absorb it, and the trunk carries it to the foliage. If one stage fails, a juniper can turn brown even after recent watering. A bonsai pot works like a small, coarse sponge. It should retain moisture around the roots while leaving air spaces and releasing surplus water through its drainage holes.
Shallow pots make this balance less forgiving. The surface may dry while the center stays wet, or water may run down a gap beside the pot wall while the central root ball remains dry. The calendar cannot show you which situation exists. Moisture checks can.
Watch the water, not the calendar
Observe the pot during and after its next watering. Run these checks at your bench:
- Check below the surface. Insert a wooden chopstick or your finger beneath the top layer. Surface color alone can mislead you.
- Water across the whole surface. Apply water evenly so it reaches the entire root zone instead of following one channel.
- Watch the drainage. Water should move through the substrate and exit below. Persistent pooling suggests restricted drainage or compacted media.
- Inspect the holes. Roots, old soil, or debris can block openings and keep the lower root zone saturated.
- Feel the pot later. A very light pot with dry substrate suggests insufficient moisture. A heavy pot that stays wet and drains slowly points to a root-zone problem.
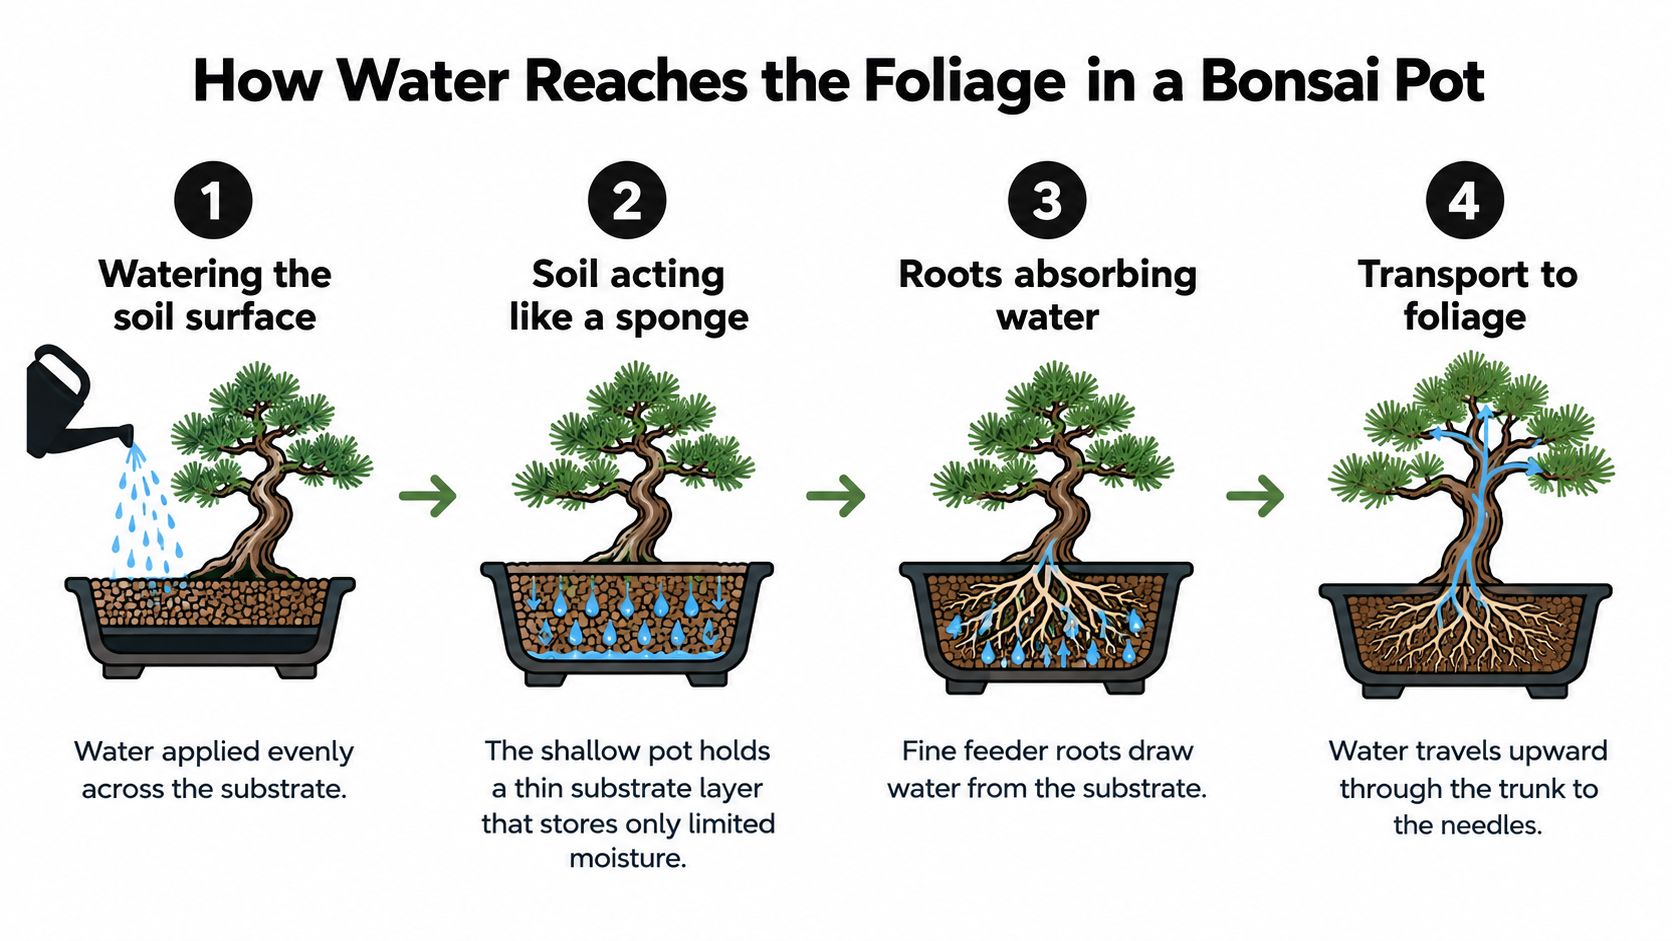
Why particle size matters
Coarse particles such as akadama, pumice, and lava create open spaces for air and help excess water leave the root zone. Fine, dense, or heavily organic media can compact around the roots. The mix may then remain wet after watering, yet become difficult to rewet evenly once it dries.
This guide to soil particle size and drainage explains why particle size changes water movement through a pot. No single mix suits every climate or watering setup. The practical test is whether your substrate holds enough moisture for the juniper while preserving oxygen and dependable drainage.
Brown foliage shows that water transport to the canopy has failed somewhere. It does not identify the failure point. Roots may lack available moisture, or saturated media may leave them short of oxygen and unable to function normally. UW-Madison Extension lists drought and waterlogged roots among causes of conifer needle browning because either condition can starve the canopy of water (University of Wisconsin Extension).
Check the root zone before changing your watering routine. This first diagnosis helps separate a genuinely dry tree from one that is wet but unable to use the water.
Drought Stress and Overwatering Look Similar but Read Differently
A juniper can look thirsty while sitting in wet soil. It can also turn brown after the root ball has dried too far. The visible symptom is similar, but the correction is opposite: a dry tree needs thorough rehydration, while a saturated tree needs more air around its roots.
Begin with three bench checks: substrate moisture, pot weight, and the pattern of browning. Do not change the watering routine until those clues point in the same direction.
A drought-stressed juniper usually has very dry substrate below the surface, a pot that feels unusually light, or a root ball pulling away from the container wall. The foliage may turn brown or purplish near exposed branch tips or higher in the canopy during summer. The affected needles feel dry and crisp, while some branches still contain green tissue. Similar signs can occur in drought stressed trees in Atlanta, where prolonged dryness limits the water available to the canopy.
Overwatering has a different bench signature. The substrate remains damp for a long period, drains slowly, or smells sour. Fine roots may become dark, soft, and mushy. As root function declines, browning can move through branches from the tips downward. Saturated media fills the spaces that should hold air, so the canopy may look thirsty even though the pot is wet.
Chronic inconsistent watering creates a third pattern. Repeated swings from severe dryness to saturation can injure fine roots and produce patchy browning across the canopy. The tree may recover poorly after each watering because the damaged roots cannot keep pace with changing moisture. Checking the substrate each time is more reliable than following a fixed calendar.
Match the evidence before acting
| Sign to Check | Underwatering | Overwatering | Inconsistent Watering |
|---|---|---|---|
| Substrate feel | Very dry below the surface and difficult to rewet evenly | Persistently damp or waterlogged | Alternates between very dry and saturated |
| Pot condition | Feels unusually light | Remains heavy for an extended period | Weight changes sharply between checks |
| Foliage pattern | Often begins at exposed tips or higher growth | May progress through branches as roots fail | Patchy browning across different parts of the canopy |
| Odor | Usually lacks a sour, stagnant smell | May smell sour or unpleasant | Odor changes after repeated wet and dry cycles |
| Root appearance | May be dry and fine, with some living tissue remaining | Dark, soft, and mushy roots are concerning | A mix of dry, damaged, and surviving roots may occur |
| First response | Water the root ball thoroughly when it is genuinely dry | Stop routine irrigation while the surface begins to dry and inspect drainage | Correct the watering method and investigate the substrate |
If the root ball is dry, water slowly until the entire mass is wet and excess water exits the drainage holes. A few drops on the surface can leave the inner root zone dry. If the media stays wet, pause routine irrigation, confirm that the drainage holes are open, and inspect the roots only when the evidence supports that step. Repotting is not the automatic answer to brown foliage.
Do not try to compensate for browning with fertilizer. Damaged roots may absorb salts poorly, and extra soluble fertilizer can increase stress, a caution from Clemson Cooperative Extension.
Brown tissue will not turn green again after the cause is corrected. Judge progress by green buds, flexible tips, and fresh growth. The right diagnosis comes from matching the foliage pattern with what the roots and substrate are showing.
Disease and Pests That Mimic Water Problems
A juniper can look thirsty while the actual problem is disease or an insect. Before watering more or repotting, read the pattern. Water-related stress usually spreads through the root zone and affects the canopy broadly. Disease and pests often leave a sharper boundary, an isolated failing branch, lesions, webbing, scale, or another visible signature on the plant.
Tip blight deserves attention when new shoots turn brown from the tip backward, especially in spring or early summer. Examine the point where healthy tissue meets dead tissue. Lesions or unusual dark structures on the shoot support a disease diagnosis. A clean branch alongside dry soil points more strongly toward environmental stress. The boundary works like a diagnostic line: inspect what changes there rather than judging the whole tree by its color.
Root rot can imitate drought because damaged roots cannot supply the foliage, even while the substrate remains wet. Do not remove the tree from its container on appearance alone. Check drainage first, then inspect the roots if persistent wetness, slow drainage, or decline makes that step reasonable. Dark, soft, mushy roots and a sour smell make root damage more likely than simple underwatering. Pathogens such as Fusarium, Rhizoctonia, and Phytophthora may be involved in a persistently waterlogged root zone, as described in juniper disease guidance from Clemson Extension.
Sap-sucking pests create a different form of confusion. Look beneath the foliage, around branch joints, and in sheltered areas for scale insects, fine webbing, stippling, sticky residue, or visible insects. Finding one of these signs changes the first response. Altering irrigation alone will not address an insect problem. Isolate the bonsai if a spreading insect or fungal issue seems possible, and improve airflow without subjecting the tree to a sudden environmental change.
| Cause | Visual Signature | Bench Check | First Treatment |
|---|---|---|---|
| Tip disease | Browning advances from shoot tips toward the branch | Examine the healthy-to-brown boundary and branch surface | Remove clearly dead tips with disinfected tools and improve airflow |
| Root rot | Decline continues while the substrate stays wet | Inspect drainage and roots for dark, soft, mushy tissue | Correct waterlogging, remove damaged roots if confirmed, and use an air-filled substrate |
| Scale or other pests | Stippling, webbing, residue, or visible insects | Inspect foliage, branch joints, and shaded areas closely | Isolate the tree and use a treatment appropriate for the pest |
| Drought stress | Dry, crispy foliage with dry root-zone conditions | Check moisture beneath the surface and inspect live tissue | Rehydrate thoroughly, then adjust watering based on moisture |
| Seasonal or interior shedding | Older inner foliage browns while new growth remains healthy | Compare inner and outer growth and observe the tree over time | Avoid drastic treatment and monitor new buds and tips |
Use the juniper spider mite guide to compare bronze, stippled foliage with a typical mite pattern. Do not spray or repot just because the tree looks brown. First identify the visual signature, then choose the treatment that matches it.
Light, Winter Burn, and Dormancy Confusion
Not every brown juniper has a root problem. A tree kept indoors near weak light may shed shaded interior foliage while its tips remain green. That can resemble disease, especially when the owner sees loose needles accumulating beneath the pot.
Junipers also respond to winter conditions. Winter burn occurs when foliage loses water while the roots can't replace it efficiently during dormancy, particularly when the tree is exposed to cold, dry wind or frozen conditions. Browning may be more pronounced on the side facing the cold source, while protected growth remains healthier. The damaged tissue won't turn green again, but surviving buds can still show whether the tree has a future.
Use a seasonal check
- In bright growing conditions: Give the tree strong light and steady airflow, while avoiding abrupt exposure changes.
- During indoor winter display: Move it to the brightest suitable location and watch whether inner foliage yellows while the tips stay green.
- During cold weather: Protect the pot from harsh wind and extreme exposure, but don't move the juniper repeatedly between warm indoor air and freezing outdoor conditions.
- During dormancy: Allow the tree a suitable cool rest rather than keeping it warm year-round beside a heater.
A late-winter warm spell can also confuse the tree. Buds may begin responding to warmth, then suffer when cold returns. Keep temperature changes gradual and pay attention to the tree's outdoor conditions rather than treating every seasonal color shift as an emergency.
Photograph the bonsai from the same angle as conditions change. Comparing images helps you distinguish a stable seasonal pattern from a branch that is rapidly declining. If new growth remains green and the brown area stays limited to older interior foliage, restraint may be more helpful than aggressive intervention.
Rescue Steps That Actually Work
If a juniper has suddenly turned brown, resist the urge to prune, repot, fertilize, and move it all at once. Those actions can add stress and make the original cause harder to identify. Rescue starts with a short diagnosis, like checking a patient's vital signs before choosing treatment.
Check before cutting
Flex a small branch gently. Scratch a tiny spot in the bark and look for green tissue beneath it. Green tissue suggests the branch may still be alive, while dry brown tissue and brittle twigs point to confirmed dieback. Examine the soil below the surface, check that water exits through the drainage holes, and inspect foliage and bark for pests, webbing, lesions, or unusual coatings.
Record your findings before changing anything. A simple note or photograph helps you avoid changing several conditions at once.
If only a few twigs are clearly dead, cut them back to live wood with a sharp, sterilized tool. Disinfect the blade between cuts when disease is possible. Leave healthy green foliage in place. Those needles are the tree's remaining solar panels, producing energy while the roots and branches recover.
Repot only with evidence
Brown needles alone do not prove that repotting is needed. Repot when you find root damage or media that stays severely waterlogged and compacted. If roots are dark, soft, and mushy, remove the tree carefully, clear away failing material, and place it in a coarse, air-filled bonsai substrate with open drainage.
A dry root zone with firm, healthy roots calls for better watering rather than immediate root work. Water thoroughly once the substrate has begun to dry, making sure the whole root ball is moistened, then let excess water drain away. Never leave the container standing in a saucer of water.
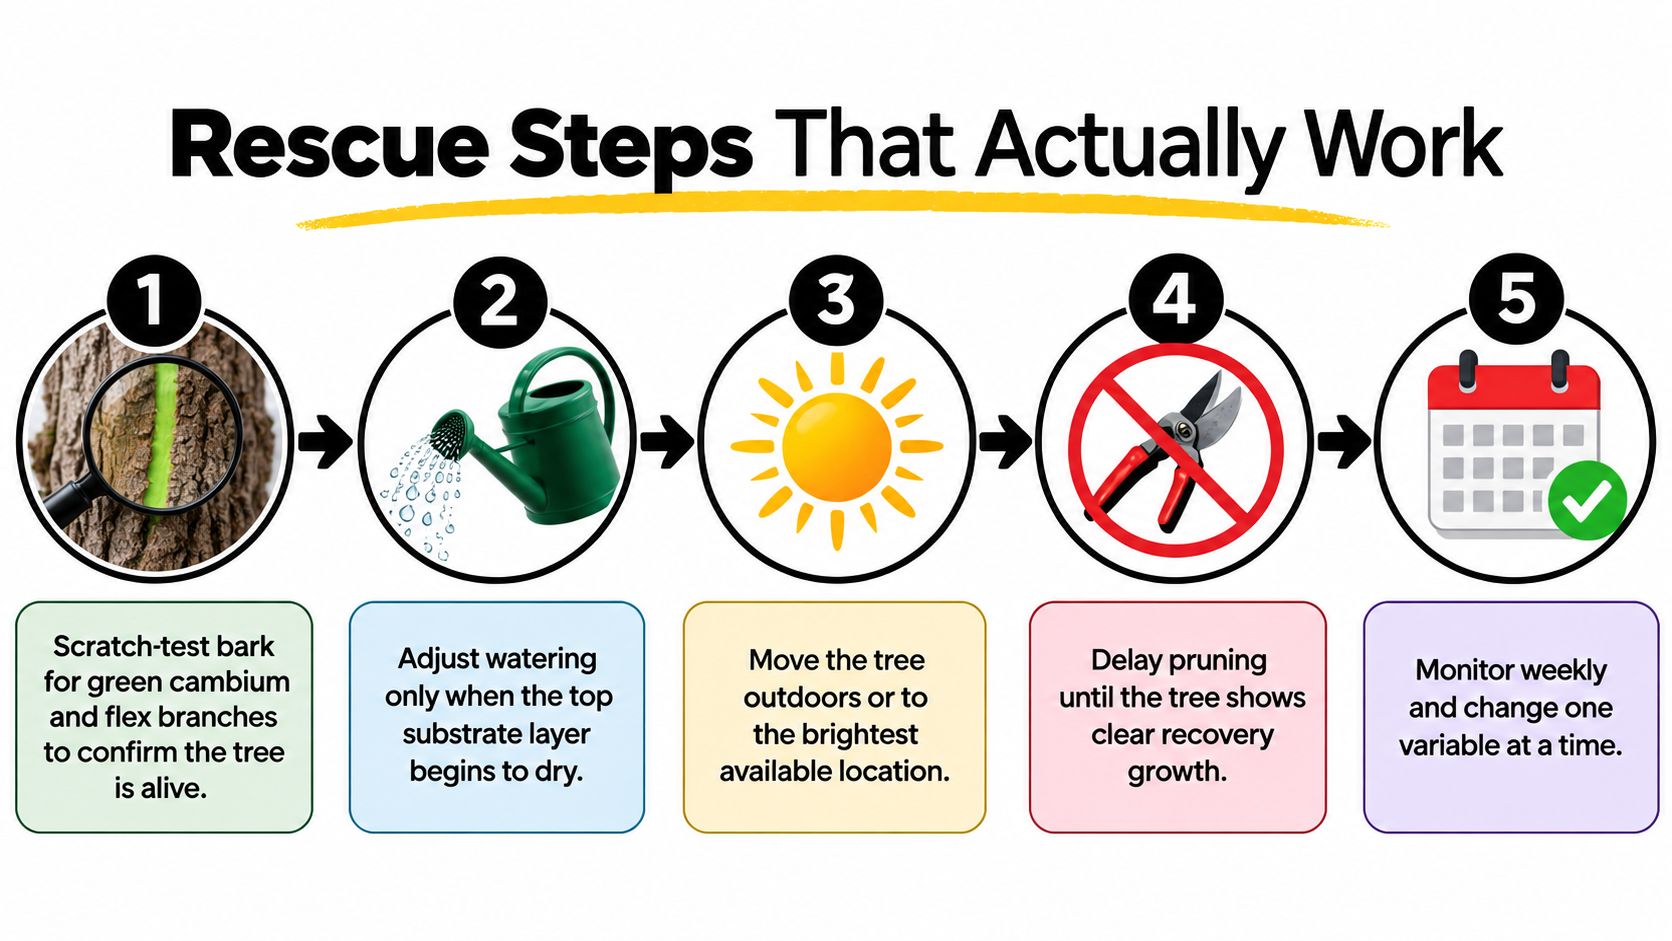
Hold fertilizer during active root stress
Fertilizer cannot restore dead foliage or repair damaged roots. Wait for stable green buds and new growth before feeding again. Follow the product label, and do not increase the dose because the canopy looks pale.
For a practical recovery sequence, compare your process with this step-by-step bonsai revival guide. Leaves & Soul offers bonsai soils, fertilizers, pots, and wiring accessories that may form part of a care setup, but supplies do not replace diagnosis.
The video below provides a visual companion to the inspection and recovery process.
Keep the juniper in bright light with good airflow, and make one change at a time. Recovery means healthy new growth, not green color returning to brown needles. Symptoms can also appear after the original stress has passed, so trace recent watering, root, temperature, and placement changes before assuming the latest event caused the decline.
Seasonal Prevention and Knowing When to Start Over
A simple seasonal rhythm prevents many emergency decisions. In spring, inspect buds, remove only confirmed dead material, and plan any appropriate root work for the right growing conditions. In summer, monitor the substrate closely because a shallow pot can dry rapidly, especially in strong light and moving air.
Autumn is a good time to inspect for pests, lesions, and drainage changes before wet weather arrives. During winter, protect the container from harsh wind and extreme exposure while allowing the juniper to experience suitable dormancy. Reduce watering only in response to slower moisture loss and actual substrate conditions, not because the calendar has changed.
Keep a small bench checklist
- Spring: Check new growth and drainage before pruning or repotting.
- Summer: Inspect moisture beneath the surface and water the whole root ball when needed.
- Autumn: Look closely for scale, webbing, lesions, and declining tips.
- Winter: Shelter the pot from damaging exposure and avoid sudden moves between warm and freezing locations.
Start over when the evidence is conclusive, not when the tree merely looks unattractive. A juniper with brittle terminal growth throughout, cracked or peeling trunk bark with no living tissue beneath it, and roots that are entirely black and mushy is unlikely to recover. If more than roughly half the canopy is dead or declining, extension guidance considers replacement often more practical (University of Minnesota Extension).
Replacement isn't a failure. Reuse the pot, clean usable wire, and learn from the moisture or exposure problem that affected the first tree. The next juniper will benefit from what this diagnosis taught you.
Once a month, photograph the canopy, test the substrate below the surface, inspect the drainage holes, and check whether the newest buds remain green.
If your juniper needs a more reliable care setup, visit Leaves & Soul to explore bonsai soils, fertilizers, pots, and accessories suited to root-zone management. Use the diagnostic checks above first, then choose only the tools that address the cause you found.