


The plant has been in the same pot for two years, the leaves near the ceiling look smaller than they did last summer, and the soil now dries out in what feels like a day and a half. Or the opposite is true: you watered on Sunday and the surface is still dark on Thursday. Both situations are telling you something about the root ball, and neither one is answered by a calendar reminder. Repotting a fiddle leaf fig is a small, controlled operation with about eight moves. The trouble almost always comes from the parts people add on: a pot four inches wider because "it'll have room to grow," a layer of gravel at the bottom because someone said it helps drainage, three weeks of fertilizer because the plant looks sulky. Get the specs right and the plant barely notices. Get them wrong and you'll spend the next month trying to work out whether the drooping is shock or rot.
Repotting Specs at a Glance
Screenshot this before you buy anything. Every row below is a practical benchmark drawn from university extension and nursery guidance, not a guarantee of success. Published horticultural sources give clear recommendations on pot scaling, drainage and mix aeration, then stop short of quoting survival or growth rates for repotting a fiddle leaf fig, so don't treat any of it as a formula.
| Factor | Target | Why it matters |
|---|---|---|
| Pot size | 1 to 2 inches wider across the top than the current pot | Surplus soil stays wet and raises root-rot risk |
| Drainage | At least one drainage hole | Stops water pooling around the roots |
| Soil mix | About 20 to 30 percent perlite by volume, or a pre-mixed fiddle leaf fig blend | Balances water hold and airflow |
| Best season | Active spring or early summer growth | Roots recover faster during growth |
| Recovery light | Bright indirect light for 7 to 10 days | Reduces transplant stress |
| Fertilizer pause | 2 to 4 weeks after repotting | Lets damaged roots regenerate |
| Repot interval | Every 1 to 2 years, guided by root condition | Crowded roots, not the calendar, signal the need |
Read the table as a set of physical constraints rather than a wish list. Pot size sets how much wet soil sits around roots that can't yet drink it. Drainage decides whether that wet soil can shed water at all. Perlite percentage determines whether the mix holds air after a thorough watering. Season, light and the feeding pause are all recovery variables: they buy the roots time to rebuild the fine absorbing tissue that got disturbed.
Practical rule: if you can only fix one thing, fix drainage. A correctly sized pot without a hole is worse than an oversized pot that drains freely.
Two of these rows are the ones people ignore. The 1 to 2 inch pot step feels stingy when you've just paid for a beautiful ceramic planter, and the feeding pause feels wrong when the plant looks tired and you want to help. Both are covered below with the reasoning behind them.
Now measure the pot you have. Width across the top rim, not the belly. Tip the nursery pot up and look for a hole, or hold it over a sink and pour a cup of water through. Everything in the sections that follow starts from that number and that answer.
When Your Fiddle Leaf Fig Needs a New Pot
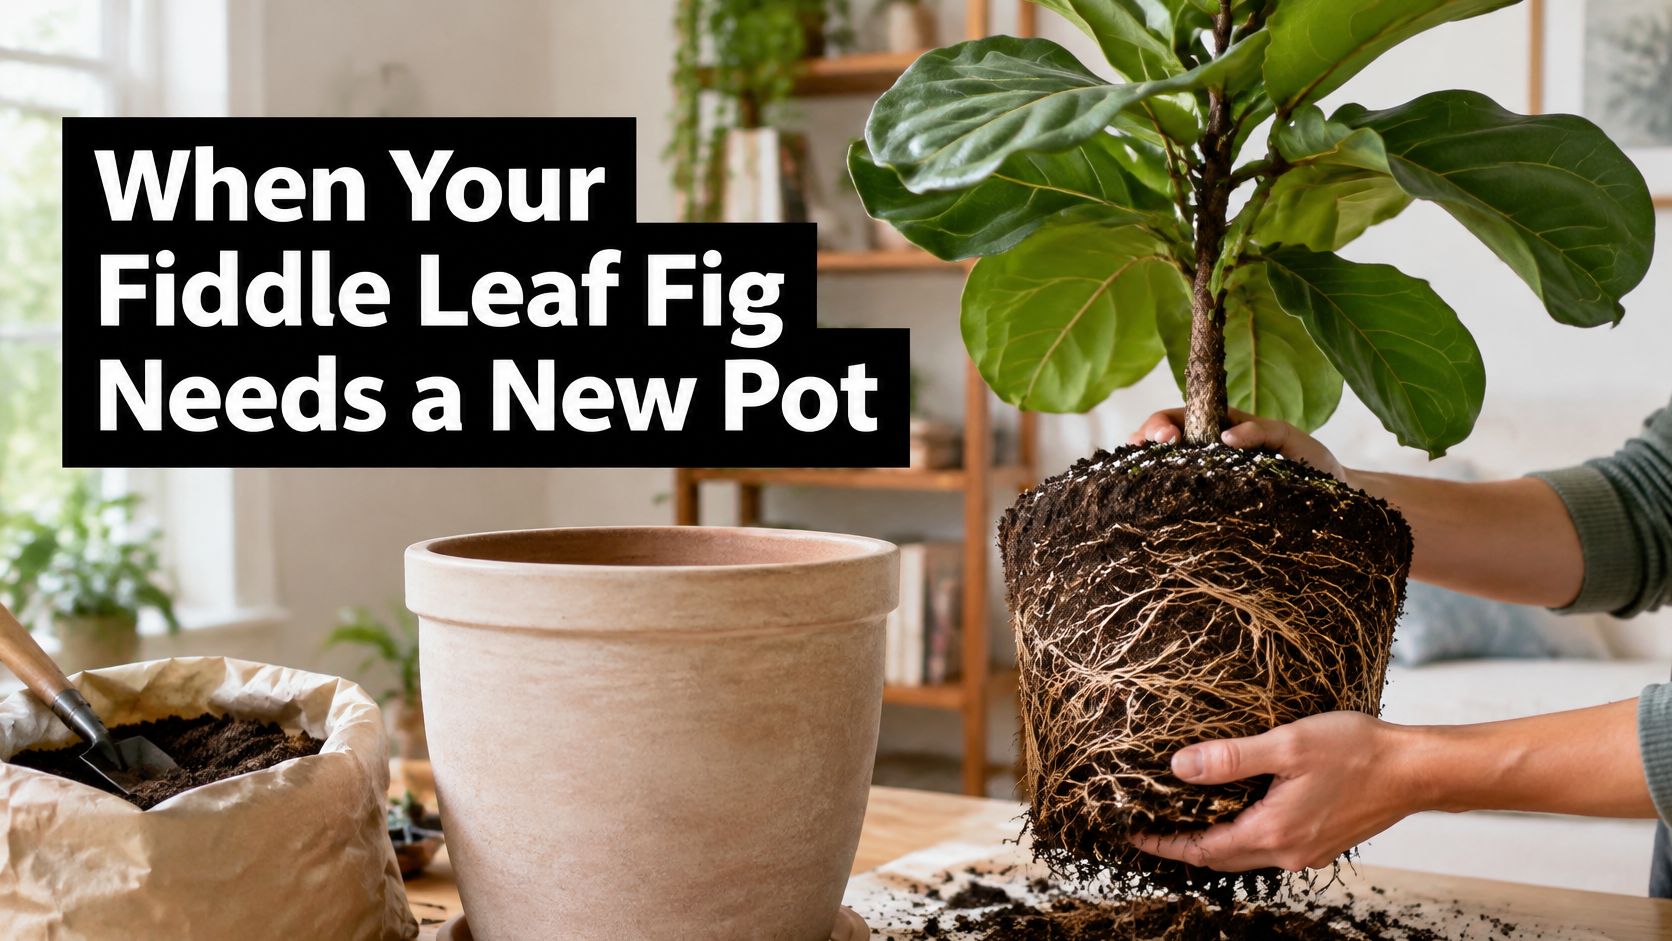
A fiddle leaf fig in a 10 inch pot that suddenly dries out in two days in July is not being dramatic. It has filled the container with roots, and too little soil remains to hold a useful reserve of water. That single symptom, a watering rhythm that shifts noticeably faster, is one of the most reliable signals you'll get.
Washington State University Extension identifies the fiddle leaf fig (Ficus lyrata) as a plant that generally benefits from repotting every couple of years, while noting that most houseplants outgrow their containers within two. The same guidance recommends repotting during the growing season, when the plant can recover more readily. Treat that window as a default, then let the roots override it.
The signals worth acting on
- Roots circling densely inside the container. Slide the plant out and you'll see a mat of roots following the wall instead of exploring outward.
- Roots emerging from drainage holes. Anything poking through the hole has already run out of room below.
- Soil drying unusually fast. A pot that used to hold moisture for a week now drying in two days means the root-to-soil ratio has flipped.
- A wobbly or tipping plant. Roots that can't anchor the trunk in a light pot signal crowding in a different way, and a top-heavy fig becomes a genuine tipping hazard.
For a visual walkthrough of how crowded roots present themselves, this guide to root bound plant symptoms shows what to look for before you commit.
The case for waiting
The reverse mistake is repotting a plant that didn't ask for it. Ficus plants tolerate being root-bound and generally grow better when repotted every one to two years under ideal conditions, per Washington State University Extension's ficus guidance. A fig that's healthy, holding its lower leaves, pushing new growth and drinking on a steady schedule can wait until the next spring window even if the roots look snug.
The decision in one line: repot for crowding or a changed watering pattern, not for a date.
Here's how the signals combine. Say your fig sits in a 10 inch nursery pot, and in mid-July you find yourself watering every second day while the plant stays limp for an afternoon after each watering. That's fast drying plus a root ball that can't buffer the gap. Lift it out and look. A dense ring of roots with little visible soil between them means repot now, while the plant is in growth. If the root ball still has loose mix falling away and the roots are weaving rather than circling, wait for spring and check again then.
Soil condition matters as much as space. Repotting refreshes a medium that has broken down, improves aeration, and replaces what compaction has ruined. If your fig's mix has collapsed into a dense brick that water runs off rather than through, that alone justifies the job.
Choose a Pot and Soil That Fit Your Plant
The two buying decisions that decide how this repot goes are the container and the mix. Both have a right answer, and both have a popular wrong one.
Drainage comes first
Every pot needs at least one hole. A decorative cachepot without drainage is fine as long as the nursery pot stays inside it and you tip out the standing water after every watering. A no-hole planter used as the primary pot leaves the bottom inch of medium permanently saturated, and fiddle leaf fig roots need air between waterings.
Size matters nearly as much as holes. Mississippi State University Extension warns that an oversized container holds more soil and water than a small root system can use, and its indoor plant care guide leaves approximately 1 inch of space below the rim so watering is easier. West Virginia University Extension gives the sizing rule from the other direction: a new pot should be only 1 to 2 inches wider than the old one, because excess soil retains moisture and increases the risk of root rot. Two extension services, same number, same reason.
The temptation runs the other way. A fig in a 10 inch pot looks lost in a 12, and a 14 inch planter looks like the plant finally has room. A large volume of persistently wet mix deprives roots of oxygen before they ever expand into it. Roots colonize air pockets, not swamp.
Why gravel at the bottom doesn't work
Rocks in the base of a pot do not improve drainage. Water moving down through a fine medium stalls when it hits a coarse layer and perches above it instead of draining through, so a gravel layer lifts the saturated zone higher into the pot. The root ball ends up sitting in a shallower column of wet soil, which is the opposite of the intended effect.
A drainage layer of gravel or stones in the bottom of a pot does not improve drainage. Skip it, use one medium through the whole pot, and let the hole do the work.
There is a stability trade-off worth naming. Tall, top-heavy figs tip in lightweight plastic, so for a large specimen a heavy ceramic or terracotta pot that respects the 1 to 2 inch rule is the sensible pick. Heavier pots cost more and are miserable to move. That is the trade: stability against portability. If you need to shift the plant for cleaning or seasonal light, keep it in a nursery pot inside the heavy decorative one.
Soil that holds air
The aeration target is roughly 20 to 30 percent perlite by volume in a porous, loamy mix, the target described in the Grange Co-op fiddle leaf fig guide. You can hit it two ways: buy a pre-mixed fiddle leaf fig blend, or combine an indoor potting mix with perlite, fine bark or coir. The pre-mixed route is faster and more consistent. The DIY route lets you tune the mix to your watering habits, chunkier if you tend to overwater, slightly more moisture-retentive if your home runs dry in winter.
Fresh mix does more than fill space. It replenishes nutrients, improves aeration and clears the fertilizer salts that build up in old container media.
Our Premium Fiddle Leaf Fig and House Plant Soil All Purpose Blend is pre-mixed for exactly this job and comes in 2.2 and 8.2 dry quart sizes for $18.47. Match the bag to the volume of your new pot, since an opened bag left half full compacts and loses quality on the shelf.
Before you check out, confirm three things:
- The new pot is 1 to 2 inches wider than the old one across the top.
- It has at least one drainage hole.
- You have enough fresh mix to fill it with nothing left over.
How to Repot Your Fiddle Leaf Fig Step by Step
For a medium plant this is a quick job, and the pace is the point. Work on a tarp or outside, and have the new pot, the fresh mix and a watering can within reach before you start, because a root ball shouldn't sit exposed while you hunt for supplies.
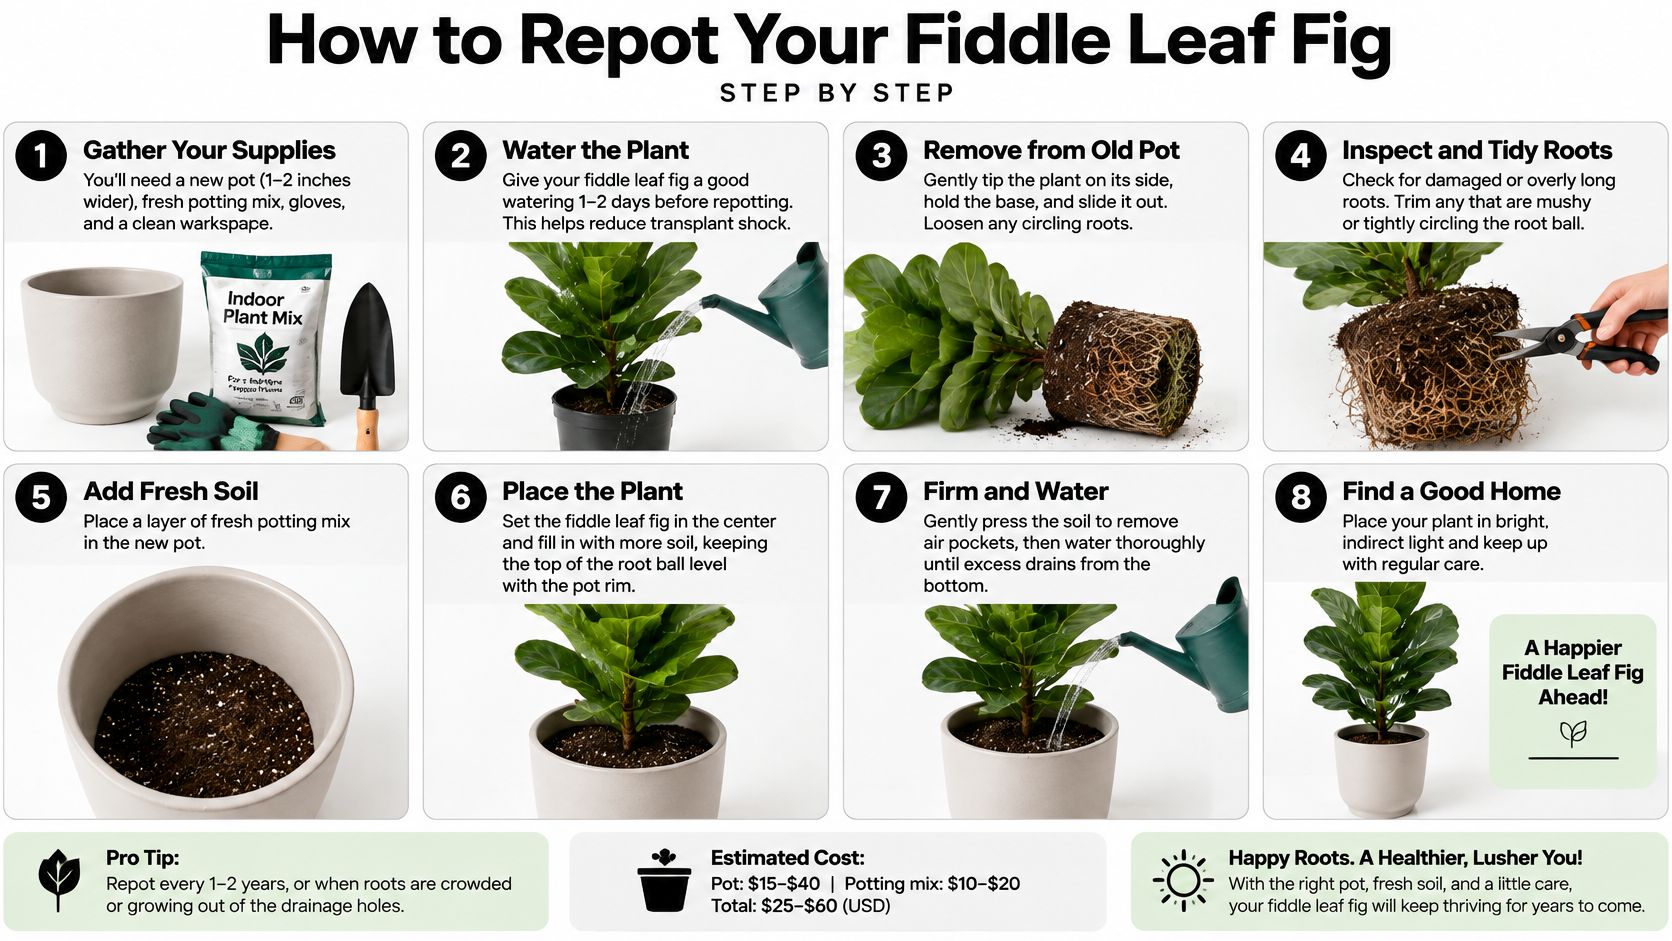
1. Water the day before. Aim for a root ball that's moist but not saturated, as the Grange Co-op repotting guide advises. A bone-dry root ball crumbles apart and sheds soil you wanted to keep; a soaked one tears and weighs a ton. The common slip is watering the same morning and then wrestling a dripping mass out of the pot.
2. Start with a base layer. Add fresh mix to the new pot to the depth that will bring the root crown back to its original height. Set the pot next to the old one to eyeball the difference. Too much base and you'll bury the crown. Too little and you'll be topping up after the plant settles.
3. Ease the plant out. Support the trunk near the base, tip the pot and work it free. If it resists, run a knife around the inside edge of the container to break the seal roots make against the wall. Never pull by the trunk alone; you'll strip fine roots.
4. Loosen only what's circling. Tease apart roots that visibly circle or have compacted into a mat, and cut away dead, mushy or damaged sections. Leave the rest of the root ball intact, since the more of it you strip, the harder the plant has to work to recover. The urge to gut a badly root-bound plant and "start fresh" is where repots go wrong.
5. Set the crown at its old depth. The point where trunk meets roots should sit where it did before. Burying it deeper is one of the most common repotting errors and it invites rot at the base of the trunk.
6. Backfill and firm. Fill around the root ball, working mix into the gaps with your fingers, and press lightly. Firm enough that the trunk doesn't shift, loose enough that the mix still has air in it. Packing it hard undoes the perlite.
7. Water until it runs through. Pour slowly and evenly until water flows out of the drainage holes, then let the pot drain completely before it goes back on a saucer or into a cachepot. This settles the mix around the roots and closes air pockets.
8. Move it out of direct sun. Park it in bright indirect light and resist the urge to fuss. What happens over the next two weeks matters as much as the repot itself.
What a good repot looks like on day one: the mix has settled about half an inch, the trunk is upright without a stake, the surface is evenly damp, and there's no puddle in the saucer.
Recover the Plant and Fix Post-Repot Decline
The month after repotting is where outcomes get decided, and it's where growers often intervene too much. Split it into three stages and give each one a specific job.
Days 1 to 7: hold everything steady
Keep the plant in bright indirect light, out of direct sun and away from drafts, heater vents and air conditioning. Montana State University Extension recommends this gentler light for several days after repotting and advises against immediate fertilization for at least two weeks while damaged roots regenerate, per its guide to repotting houseplants.
Water only when the upper mix begins to dry. Check the pot's weight in your hands rather than a fixed schedule; a freshly watered pot is heavy and a dry one is startlingly light. Don't feed. Don't prune. Don't rotate it to a new spot every day.
Expect some mild yellowing or leaf drop. That's transplant shock, and it's normal.
Days 8 to 14: reintroduce normal conditions
Move the plant gradually back toward its usual spot over a few days rather than all at once. Water after a moisture check, not on a countdown. Still no feeding. If the plant is holding steady with only minor leaf loss, you're through the risky part.
This is also the window where the difference between stress and a real problem becomes visible. Humidity around the plant often shifts after a repot, and why humidity drops after repotting covers the why and the fix without turning your living room into a greenhouse.
Days 15 to 30: resume and observe
Return the plant to its usual spot. Water by how fast the mix dries. Resume feeding only after the 2 to 4 week pause, and start light. Our Fiddle Leaf Fig and House Plant Fertilizer Pellets 16-5-11 Slow Release at $11.38 is a slow-release option applied as directed on the package, which suits this stage because it doesn't dump a concentrated dose onto roots that are still rebuilding.
Match the symptom to the cause
| Symptom | Likely cause | Action |
|---|---|---|
| Drooping leaves, soil still moist | Root disturbance reducing water uptake | Keep conditions steady, do not reposition, wait 1 to 2 weeks |
| Browning leaf edges that worsen | Direct sun, drafts or heat during recovery | Move to bright indirect light away from vents |
| Soil dries within a day | Mix too sandy or pot too large | Check the root ball, water less often, adjust the mix at the next repot |
| Soggy soil, black or mushy roots | Waterlogged root zone or root rot | Unpot, cut back to firm roots, repot in fresh drier mix with a drainage hole |
| Yellowing leaves and leaf drop | Mild transplant shock or overwatering | Confirm drainage, hold off on feeding, let the plant settle |
The line between rows one and five and rows two and four is the whole diagnostic. Mild drooping in moist soil is a plant adjusting. Progressive browning, sour-smelling soil and black roots are a moisture problem that won't fix itself.
Run the root test
If you're unsure, unpot the plant. Firm, pale roots that smell of clean soil are recovering. Black or brown roots that squash between your fingers are rotting, and no amount of waiting will reverse that.
For rot, cut back to firm white tissue with clean shears, discard the soggy mix and repot into fresh, drier medium in a pot with a drainage hole. Then water sparingly until you see new growth.
What not to do: don't keep repositioning the plant, pruning it, or feeding it while roots stabilize. Repeated intervention is the most common way a routine repot turns into a lost plant.
Montana State's guidance lists the classic failure modes: moving into a pot several sizes larger, burying the trunk or root crown deeper than before, packing the mix tightly, and aggressively removing healthy roots. Its repotting interval is every two to three years, or earlier when roots emerge from drainage holes, appear on the surface or the medium dries substantially faster than before. Treat that as the outer edge of the window rather than a target.
When the next repot comes round, check the root ball at 12 to 24 months and go in spring if it's crowded. Same drainage rule, same 1 to 2 inch step, same fresh mix, same feeding pause. The repeat is easier than the first because you'll know what your plant's root ball looks like.
Repotting is one of those jobs where the right supplies do most of the work, and we stock the two that matter most: our pre-mixed Premium Fiddle Leaf Fig and House Plant Soil All Purpose Blend in 2.2 and 8.2 dry quart sizes for $18.47, and our 16-5-11 Slow Release Fertilizer Pellets at $11.38 for the feeding stage once roots have settled. Match the bag to your new pot's volume, keep the pellets until the four-week mark, and you'll have everything the job needs in one order. Visit Leaves & Soul to check sizes and current pricing before your next spring window.