


Your plant droops before the next watering, even though you haven't changed its care. The newest leaves look smaller, water disappears into the saucer, and you're wondering whether a bigger pot or more fertilizer will help.
Start with neither. Root bound plant symptoms overlap with root rot, underwatering, and tired potting mix. The useful distinction is below the surface: whether the roots are crowded but healthy, decaying in wet medium, or sitting in a dry root ball that never gets thoroughly wetted.
Root-Bound Symptoms at a Glance
Wilting despite regular watering is often the first warning, but watering on schedule doesn't guarantee that roots receive water. A dense root mat can leave dry pockets inside the pot while other areas remain damp and poorly aerated.
Pale foliage, scorched edges, stunted crown growth, few new leaves, premature leaf drop, and poor color all deserve attention. NC State Extension's diagnostic tables list wilting, poor color, and limited new growth as a root-bound symptom pattern. None of those signs alone identifies the cause.
Match the symptom to the next check
Root-bound symptoms, what you see and what to check next
| Symptom | What You See | Check Next |
|---|---|---|
| Wilting despite regular watering | Soil dries fast and leaves droop between waterings | Feel the root ball and track how fast the medium dries |
| Pale or scorched leaves | Lighter-green foliage or brown leaf edges across the canopy | Review light, feeding, and recent watering habits |
| Stunted crown and few new leaves | New growth becomes smaller or slower | Look for roots growing out of drainage holes |
| Premature leaf drop or early color | Leaves drop or change color unexpectedly | Slide the plant out and inspect the root mass |
| Roots at drainage holes | Roots emerge from the base or surface | Confirm root density before repotting |
| Water runs straight through | Water drains immediately while the center stays dry | Check whether roots have displaced most of the medium |
| Roots spiraling around the trunk | Roots coil against the stem base | Inspect for constriction before disturbing them |
Roots emerging from a drainage hole are a stronger clue than yellow leaves, but an exploratory root isn't an emergency. Likewise, water can bypass a root ball because dry potting mix repels it, not because the container is full of roots.
Look for a developing pattern rather than treating a single difficult week as proof. A plant can show several foliage symptoms while its root mass remains loose, especially after a change in light, temperature, or watering.
Practical rule: Confirm a dense circling root mat before choosing repotting as the fix. Wilting alone isn't proof of binding.
Why Circling Roots Stall Growth
Roots grow outward until they meet the container wall. In a smooth-sided pot, they can turn sideways and follow the perimeter instead of branching into fresh growing medium.
The outer root ball shows the pattern clearly.
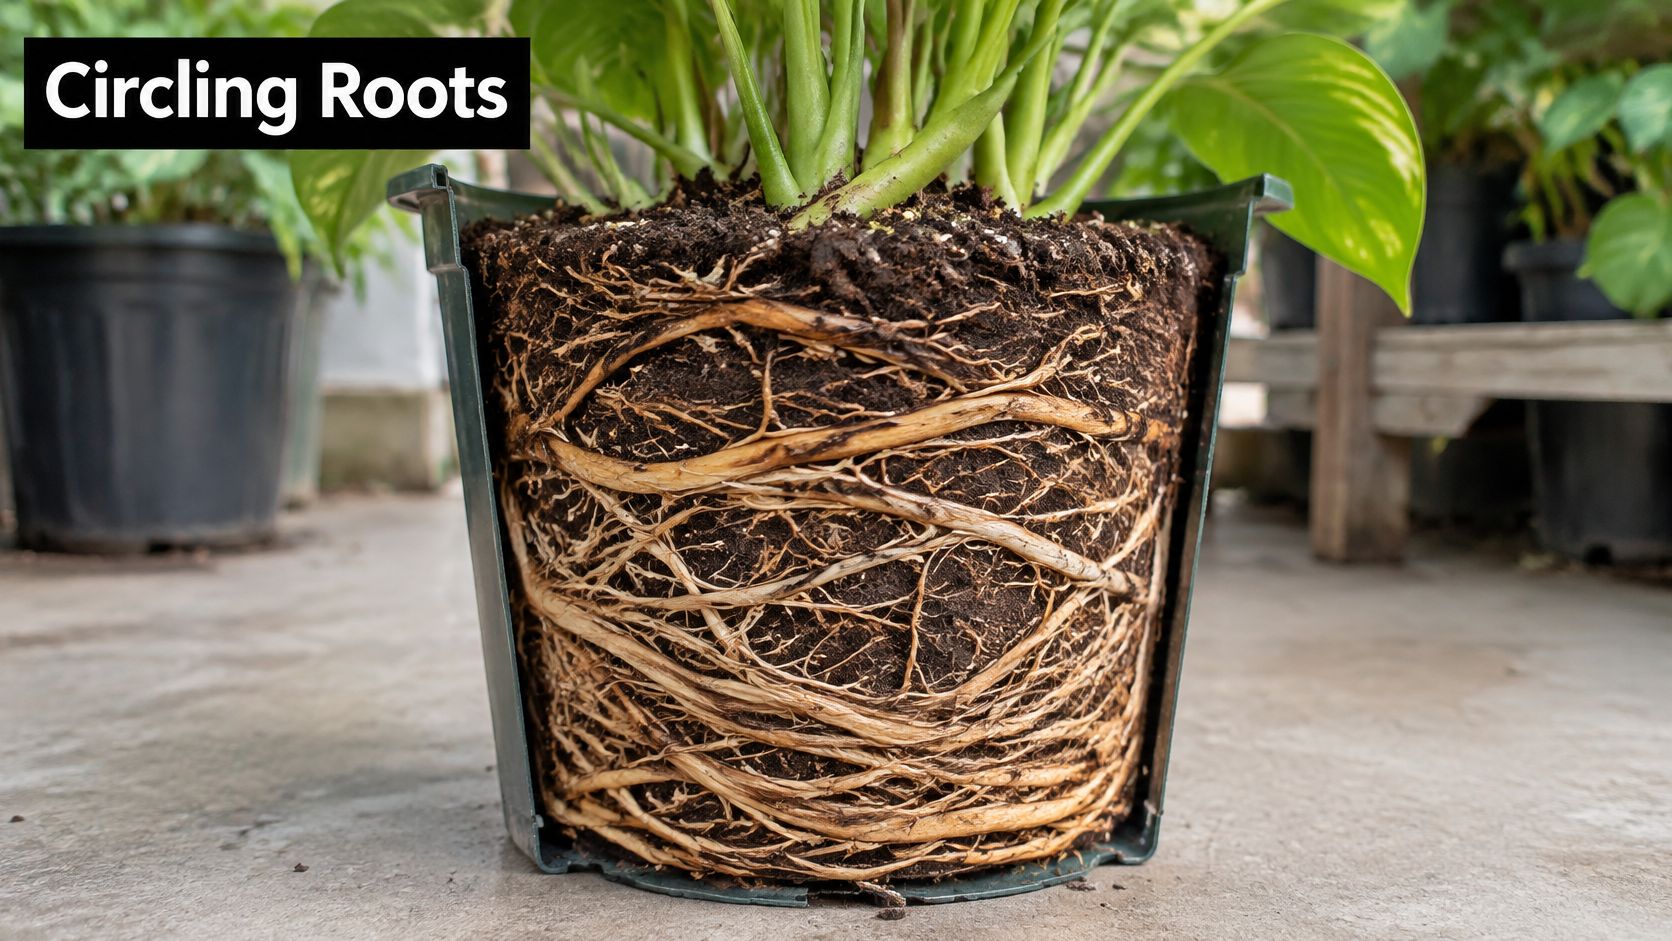
As those roots thicken and become woody, the deformation becomes harder to reverse. Think of a rope coiled tightly in a box: lifting it into a bigger box doesn't automatically straighten the coil.
The Arnold Arboretum's explanation of circling roots connects uncorrected root deformation with slower establishment and reduced stability after planting. Roots wrapped around a stem or trunk can also become girdling roots, restricting vascular tissues as both the trunk and roots enlarge.
Restricted space affects more than root appearance
A plant with limited root space may produce shorter shoots and smaller leaves before it looks severely congested. Less leaf area means less canopy expansion, while restricted root capacity makes consistent water and nutrient supply harder to maintain.
In a 2020 chilli-plant experiment, plants with restricted roots reached 73.8 cm versus 86.0 cm for controls by day 98, a 14% difference, with reduced leaf area and photosynthetic rate, according to the published chilli root-restriction study. That result describes experimental chilli plants, not a prediction for how much height your houseplant will lose.
The practical point is that green leaves don't rule out root restriction. A plant can remain presentable while producing progressively less new growth, so repeatedly adding fertilizer may leave the actual limitation untouched.
A visual demonstration can help you recognize the difference between loose roots and a compact outer mat.
What a bigger pot can and can't solve
Fresh space helps only when roots can enter it. A hardened outer mat can remain wrapped around the old root ball while the surrounding new mix stays relatively unoccupied.
For woody nursery stock, that matters beyond growth rate: poor outward root development can compromise anchorage. For houseplants, the immediate concern is usually uneven hydration and prolonged transplant recovery.
When growth repeatedly stalls despite suitable light, sensible watering, and adequate nutrition, inspect both container capacity and root condition. Don't assume the plant needs stronger feeding just because its leaves are smaller.
How to Confirm Root Binding in Four Checks
The PlantFix root-bound plant guide emphasizes examining the roots because foliage symptoms overlap with general root stress. A tight, firm root mass calls for a different response from soft, decaying roots, even when both plants have yellow leaves.
Use a tray, a wooden skewer, and clean scissors for any roots trapped through drainage holes. You're inspecting first, not committing to root pruning.
Inspect before making a change
- Check moisture and drainage. Water when the plant normally needs it, then feel below the surface and note the pot's weight. Use a wooden skewer to check whether the center remains dry while the edges become wet, and empty standing water from the saucer.
- Look at the container's exits. Examine the drainage holes and soil surface for root clusters. Check that drainage holes aren't blocked, and distinguish a few exposed roots from a continuous mat that plugs the base.
- Slide out the root ball. If the medium is dusty and crumbly, moisten it lightly and allow excess water to drain before handling. Support the root ball and stem base, tap or squeeze the pot's sides, and ease the plant out without pulling on its trunk or foliage.
- Read the pattern, texture, and smell. Examine the sides and bottom for roots circling densely along the pot's shape with little loose medium between them. Gently pinch a suspect root: firmness supports healthy crowding, while a soft texture, slipping outer skin, or sour smell suggests decay.
Separate the likely causes
Root binding, root rot and underwatering compared
| Root Trait | Root Binding | Root Rot | Underwatering |
|---|---|---|---|
| Root color and texture | Often white or tan and firm | Brown or black, soft and mushy | May be pale, dry, and brittle |
| Root pattern | Dense circling mat with little loose medium | Affected roots lose firm structure and fall apart | Fine tips may dry out; roots need not circle |
| Medium | Mostly roots with little growing medium | Often persistently wet and sour | Dry and potentially shrunken from the pot wall |
| Drying speed after watering | Often dries quickly or unevenly | May stay wet unusually long | Dry mix may resist rewetting |
| Smell | Earthy or none | Sometimes sour or rotten | Usually none |
Color is a clue, not a verdict. Some healthy roots are naturally darker, and rot doesn't always produce an obvious odor. Judge texture and root structure alongside color.
A crowded root ball can also contain rotten roots. Finding circling roots doesn't cancel out evidence of decay.
This distinction matters for fiddle-leaf figs, orchids, bonsai, and succulents because their normal watering needs differ. An orchid's firm silver roots aren't equivalent to a houseplant's brittle, desiccated fine roots.
If the root ball is loose and healthy, return it to its pot without dismantling it. Reserve a space-driven repot for roots that fill the container; treat rot or incomplete wetting as separate problems before adding fertilizer.
How Symptoms Differ by Plant Type
A plant can experience root restriction without roots showing outside the pot. Smaller leaves, shorter spaces between leaves, and reduced shoot extension can appear before dramatic external signs.
In a tomato container experiment, small pots reduced height, node number, leaf area, and leaf dry weight within two weeks, with lower stem and root dry weights by four weeks, according to the tomato root-volume study in the Journal of the American Society for Horticultural Science. These are early effects of restricted root volume, not proof that every small-leaved plant has a circling root mat.
Compare the plant with its normal growth habit
Root-bound signs and repotting signals by plant type
| Plant Type | Typical Root-Bound Sign | Watering Pattern to Watch | Repotting Signal |
|---|---|---|---|
| Bonsai | Roots lift above the soil line or form a dense surface mat | Rapid drying in warm weather | Packed roots prevent reliable wetting |
| Fiddle-leaf fig | Smaller new leaves, stalled growth, and unevenly dry roots | Uneven wetting and drying | A congested root ball accompanies stalled active growth |
| Succulents and cacti | Circling basal roots or pressure against the container | Persistent dampness suggests a mix or drainage problem, not binding alone | Root pressure deforms or cracks the pot |
| Orchids | Crowded internal roots, sometimes alongside deteriorating bark | Judge bark moisture and root condition together | Bark breaks down or healthy internal roots overcrowd the container |
Different goals require different decisions
Bonsai growers deliberately constrain root volume to help control size and architecture. Slower growth may be acceptable, but unreliable water penetration isn't; inspect the surface mat and drainage before deciding whether to root-prune rather than enlarge the pot.
For fiddle-leaf figs, compare new leaves with older leaves produced under similar light. Leaf drop immediately after repotting can reflect disturbance, so don't interpret it as proof that the replacement pot is still too small.
Succulents need a different filter. A compact rosette can be normal, and a rocking plant may have lost roots rather than outgrown its container. Check stem firmness and anchorage before treating either sign as crowding.
Orchid aerial roots are normal and don't automatically require a bigger pot. Shriveling deserves inspection, but deteriorating bark may justify replacing the medium even when container size remains suitable.
For a broader explanation of growth differences, read why some plants outgrow their pots faster than others. When planning an outdoor container collection, OutdoorBrite's backyard design ai can help visualize placement and access for watering, though it can't diagnose root health.
Start with water penetration for bonsai, recent growth and moisture distribution for figs, root firmness for succulents, and bark condition for orchids.
How to Repot a Root-Bound Plant
Repotting should release the root system into fresh medium, not merely hide the old root ball inside a larger container. Match the amount of disturbance to the plant's size, root type, and condition.
This overview shows the handling sequence.
Prepare the plant and release the roots
- Moisten the root ball if needed. Aim for cohesive, lightly moist medium that holds together during removal. Don't add water to a pot that's already saturated, especially if decay is suspected.
- Remove it onto a tray. Support the plant from beneath and loosen the container rather than yanking the stem. Cut away a disposable nursery pot if forcing removal would tear substantial roots.
- Tease moderate congestion outward. Use your fingers or a blunt chopstick to loosen the perimeter and bottom, leaving the central root mass intact. Don't comb every root bare just because some old medium remains.
- Use cuts selectively on a solid mat. The Snohomish County planting guide describes approximately 4–8 shallow vertical cuts for dense root masses and cites University of Florida guidance to remove roughly the outer 0.5–1 inch from the sides and bottom of severely root-bound masses. Those nursery-stock dimensions aren't automatic instructions for a small indoor plant; keep any cuts proportionate and preserve the main root crown.
A clean, sharp knife cuts more predictably than a blunt blade that crushes roots. Spread released roots outward where they'll contact the new medium, rather than folding them back against the old ball.
Thick roots constricting a woody trunk need particular care. If removing one would sacrifice a major part of the root system, get plant-specific advice instead of making an aggressive cut.
Set up the new root zone
- Choose a modestly larger container. Leave practical space around the released roots without surrounding them with a large reservoir of unoccupied wet mix. Confirm that drainage holes work before filling the pot.
- Use fresh, structured medium. Choose an airy houseplant blend, gritty succulent mix, orchid bark, or a bonsai substrate appropriate to the plant. Don't pack fine compost tightly around a dense root ball.
- Keep the original planting depth. Set the root crown at its previous height, work medium gently around the roots, and settle it with water appropriate to the plant. Don't bury the stem to make a top-heavy specimen stand upright; use temporary support instead.
The indoor plant repotting guide offers additional help with container selection and handling. For most healthy houseplants, active growth is the easiest time to undertake elective root work.
Cutting caution: Avoid heavy root removal during heat or drought stress. A plant with fewer functioning roots has less capacity to support its existing foliage.
Air-root-pruning containers can reduce future circling by exposing root tips to ventilated walls. They also change drying behavior, so they require closer moisture monitoring than a conventional closed-sided pot.
Aftercare and Prevention for the Next Cycle
After repotting, keep conditions stable rather than trying to force immediate new growth. Avoid unusually harsh direct sun while the plant adjusts, but don't move a light-loving plant into a dark corner.
Check both the old root ball and the fresh surrounding mix before watering. They can dry at different rates, and the dampness of the new medium doesn't tell you whether the original root mass is adequately hydrated.
Reset watering before feeding
- Prevent saturation. Overwatering a freshly repotted plant keeps unoccupied medium wet and deprives recovering roots of air.
- Delay extra fertilizer. Feeding before the plant resumes healthy growth can add unnecessary salts, particularly when the fresh mix already contains nutrients.
- Leave placement steady. Some leaf drop after disturbance is possible; repeatedly moving or repotting the plant adds another stress rather than settling the first one.
For foliage houseplants, aim for evenly hydrated roots without persistently soggy medium. Succulents still need a drying interval, while orchids need air around their roots and moisture management suited to their bark.
Match the medium to the plant
A free-draining, structured mix suits fiddle-leaf figs and many other houseplants. Succulents and cacti need a gritty blend, orchids generally need a suitable bark-based substrate, and bonsai require a blend that balances drainage with the water reserve their shallow containers can provide.
Once healthy growth resumes, Leaves & Soul's slow-release Bonsai Fertilizer Pellets or Fiddle Leaf Fig and House Plant Pellets are options alongside plant-appropriate liquid feeds. For pellets, measure the product's stated container dose and account for fertilizer already present in the mix; don't add a liquid feeding schedule on top by default.
Prevention starts with inspection during active growth, not automatic annual pot enlargement. Keep drainage holes open, avoid compacting the medium, and assess long-term container plants such as bonsai and fiddle-leaf figs before watering becomes difficult.
If drooping continues without improvement, check root moisture and condition rather than assuming the plant needs feeding. A sour root ball, worsening stem softness, or spreading decay warrants prompt attention, not a longer wait for transplant recovery.
Decide Whether to Repot This Season
Choose based on the root ball, the plant's condition, and whether it's actively growing. A larger pot is a treatment for inadequate root space, not a general remedy for unhappy foliage.
Repot or correct care first
- Repot during active growth. Choose this when a dense circling mat occupies the perimeter, normal wetting is difficult, and growth has stalled despite suitable care. Release the congested roots and provide a modest increase in usable space.
- Wait and watch. Choose this when roots remain loose and healthy, or the plant is dormant and only mildly crowded. Correct incomplete wetting, poor drainage, or unsuitable light before undertaking elective root work.
Suspected rot belongs in neither an automatic pot-up nor a passive waiting category. Inspect promptly and address decaying roots and the conditions that kept them wet.
Use the guide to when to repot a plant to align elective work with the plant's growth cycle. Track new leaves, drainage-hole root growth, and drying behavior, then set a spring reminder to inspect again.
Leaves & Soul offers purpose-built soils, plant nutrients, and bonsai accessories for managing container plants from the roots upward. Visit Leaves & Soul to choose a suitable growing medium once you've confirmed whether your plant needs more space, better drainage, or a different watering routine.