


You're standing in front of your bonsai with a coil of wire in one hand and a branch that clearly needs repositioning in the other. The tree is small, but the decision feels surprisingly serious. Should the wire go around the branch or the trunk? Is aluminum strong enough? How tightly should you wrap it, and when will you need to remove it?
Wire for bonsai is a temporary training tool. Used correctly, it acts like a splint that holds living wood in a new position while the branch gradually retains that shape. Used carelessly, it can press into expanding bark, leave scars, or snap a delicate branch. The safest approach is to make three decisions before you bend anything: choose the material, match the diameter to the branch, and set a schedule for checking the wire.
The technique itself is relatively recent in bonsai history. One historical account places its beginning about 120 years ago, while another records wire-based shaping in 1910, showing that metal wire entered bonsai practice in the early twentieth century rather than belonging to the oldest forms of the art. Bonsai Station's history of bonsai wire explains how this shift gave growers more precise control over branch placement and trunk movement.
A coil of wire costs little compared with a tree, but misuse can create damage that takes years to hide. A calm first project, with the right gauge and frequent checks, teaches more than forcing a dramatic bend. For a basic overview of the wrapping process, see this guide to how to wire bonsai trees.
Starting Your First Bonsai Wiring Project
Begin by looking at the branch without touching it. Decide where you want the branch to finish, then trace the movement back toward the trunk. A beginner often focuses on the tip, but the useful bend usually starts closer to the branch base. If the base stays in the wrong position, a beautifully wired tip can still leave the tree looking unbalanced.
Think of wire as a temporary splint, not a permanent brace. A splint supports a limb while the underlying structure adapts. Bonsai wire does the same thing. It holds the branch in position while new growth and the wood's natural stiffness help the branch remember the bend. Once the branch has set, the wire must come off.
Your first wiring project has three practical decisions:
- Material: Choose pliable aluminum for an easy, forgiving start, or copper when a stronger hold matters.
- Diameter: Match the wire to the branch's thickness and resistance, not just to the tree's species.
- Monitoring: Decide when you'll inspect the bark before you make the first wrap.
The tree's behavior matters as much as its label. A flexible young ficus branch and a stiff juniper branch may have similar diameters but need different handling. Bark texture, growth speed, and the force required to move the branch all influence the choice.
Practical rule: If you need to use extreme force to make the bend, stop and reassess. Wire should guide the branch, not overpower it.
Before wiring, clear away leaves or shoots that obstruct the working area, but avoid combining major pruning and aggressive bending unless you understand how the tree will respond. Hold the branch in its intended position for a moment. If it springs back strongly, plan for a firmer wire or a different technique, such as guy wiring. If it moves smoothly, a lighter gauge may be enough.
Your objective isn't to make the branch look permanently fixed in one session. It's to create a stable, controlled position with enough room for the branch to grow and enough access to inspect the bark. That mindset makes the choice between aluminum and copper much easier.
The Three Main Wiring Materials Explained
Bonsai wire behaves differently depending on the metal and the way it has been prepared. Annealed aluminum is soft and forgiving, almost like a pencil that yields under thumb pressure. Copper feels more like a firm guitar string. It takes more effort to place, but it holds a bend with greater authority. Galvanized steel is closer to picture-hanging wire, useful in some heavy structural situations but less comfortable for ordinary branch work.
Annealing means heat-treating metal to make it more pliable. Bonsai aluminum is commonly sold in a softened, workable state. Copper can also be prepared for bonsai use, although thick copper may need preparation before it becomes easy to bend. A useful explanation of this treatment appears in this guide to annealed copper wire.
Aluminum for control and forgiveness
Anodized aluminum is widely used because it's easy to bend, simple to place, and less demanding on the hands. It's a practical choice for beginners and for trees with softer or more sensitive bark. Aluminum can also be removed and reused when it remains straight and undamaged.
Its limitation is holding power. A thick or stubborn branch may require a larger aluminum gauge than the equivalent copper wire. More wire can mean a bulkier appearance, and repeated bending can weaken the metal.
Copper for stronger bends
Copper grips a bend more firmly and can create a clean, compact wiring pattern on branches that resist movement. It's especially useful when the branch needs reliable support and the wire must stay close to the wood. Copper is more expensive than aluminum and becomes harder to reshape after repeated bending because it work-hardens.
Copper also demands better timing. A strong wire that stays on an actively growing branch can press into the bark quickly if you stop checking it.
Galvanized steel for unusual heavy work
Galvanized steel appeared in earlier stages of bonsai wire development. Historical summaries describe zinc-galvanized steel as an initial material, followed by copper and aluminum in wider bonsai use. The history of bonsai also describes the twentieth-century transition from string and rope toward metal training wire.
Steel is stiff and can be awkward around ordinary branches. It may have a role in heavy trunk work or situations where a very strong structural support is needed, but it isn't the natural first choice for a beginner's branch.
Bonsai wire materials at a glance
| Property | Annealed Aluminum | Copper | Galvanized Steel |
|---|---|---|---|
| Feel in the hand | Soft and easy to bend | Firm and increasingly stiff after bending | Rigid and less forgiving |
| Holding strength | Moderate | High | High for heavy structural work |
| Best general use | Beginners, deciduous trees, tropicals | Resistant branches and refined conifer work | Unusual thick bends and structural support |
| Main drawback | May need a thicker gauge | Costs more and is harder to reshape | Can be harsh and difficult to position |
| Reuse | Often reusable if undamaged | Limited after repeated bending | Depends on condition and shape |
No material is automatically superior. The right choice depends on how much force the branch needs, how sensitive its bark is, and how closely you can monitor the wire.
Matching Wire Gauge and Flexibility to Your Tree
You are wiring a young maple branch that bends easily, then reach a mature juniper branch that springs back immediately. Both may have the same diameter, yet they need different support. Choose wire for the branch being trained, not just for the species on the plant tag.
A practical starting rule sets wire at about one-quarter to one-third of the branch diameter at its thinnest point, according to this bonsai wire sizing guide. Use the smallest wire that can hold the intended shape. An oversized coil adds pressure, makes placement harder, and takes longer to remove.
Measure where the wire will carry the greatest load, usually near the branch base. A small ruler is adequate for a quick estimate, while calipers provide a more dependable reading. Measuring only the tip can mislead you because the tip may be much thinner than the wood that determines the bend.
Match resistance, not just diameter
Branch behavior should guide the material choice. A young, flexible deciduous shoot often moves with gentle pressure, making aluminum easy to place and adjust. Mature or springy wood may need copper because its greater holding strength resists the branch's tendency to return to its original position.
Two branches with the same diameter can also differ by age. Size the main wire for the older, stiffer wood, then let a younger shoot follow with a lighter companion wire rather than forcing both with one heavy coil. This approach supports the difficult section without placing unnecessary pressure on the tender growth.
Bark sensitivity changes the decision. Thin or easily marked bark requires moderate tension and frequent inspection. Thick bark may tolerate firmer support, but growth can still pull the wire into the branch. Material choice cannot replace careful wrapping and observation.
Wire gauge by branch thickness
| Branch Diameter | Recommended Wire Gauge | Best Material Note | Typical Species |
|---|---|---|---|
| 5 mm | About 1.5 to 2 mm | Aluminum for flexibility, copper when extra hold is needed | Juniper, ficus, young maple |
| 10 mm | About 3 to 4 mm | Choose the smallest gauge that holds the bend | Elm, ficus, pine |
| 15 mm | About 4 to 5 mm | Copper can provide stronger support on resistant wood | Juniper, pine, mature branches |
These measurements are starting points, not fixed prescriptions. A flexible branch may hold with a lighter wire, while a short, rigid branch may need stronger support even at the same thickness. If the wood is unusually resistant, two thinner wires placed neatly together can provide support without the bulk of one oversized wire.
Branch behavior matters more than the species label. Ask how flexible the wood is, how quickly it grows, and how much pressure the bark can tolerate.
The wire should hold the branch without forcing a sharp angle. If the coil slides, increase the gauge slightly or improve the anchor. If the bark looks compressed, the wire is too tight, too thick, or both. Aim for controlled movement with enough room for the bark to expand.
Growth rate determines the watch schedule. Inspect fast-growing shoots every few days during active growth, and check slower, older branches at least weekly. A heavier wire may hold a difficult bend, but it concentrates pressure. A lighter wire is often safer for flexible wood when you can maintain regular inspections.
How to Apply Wire Without Damaging Bark
Before touching the tree, rehearse the motion with a loose piece of wire. Hold the branch in one hand, keep the wire in the other, and practice making a steady spiral. The wire should follow the branch rather than corkscrew away from it.
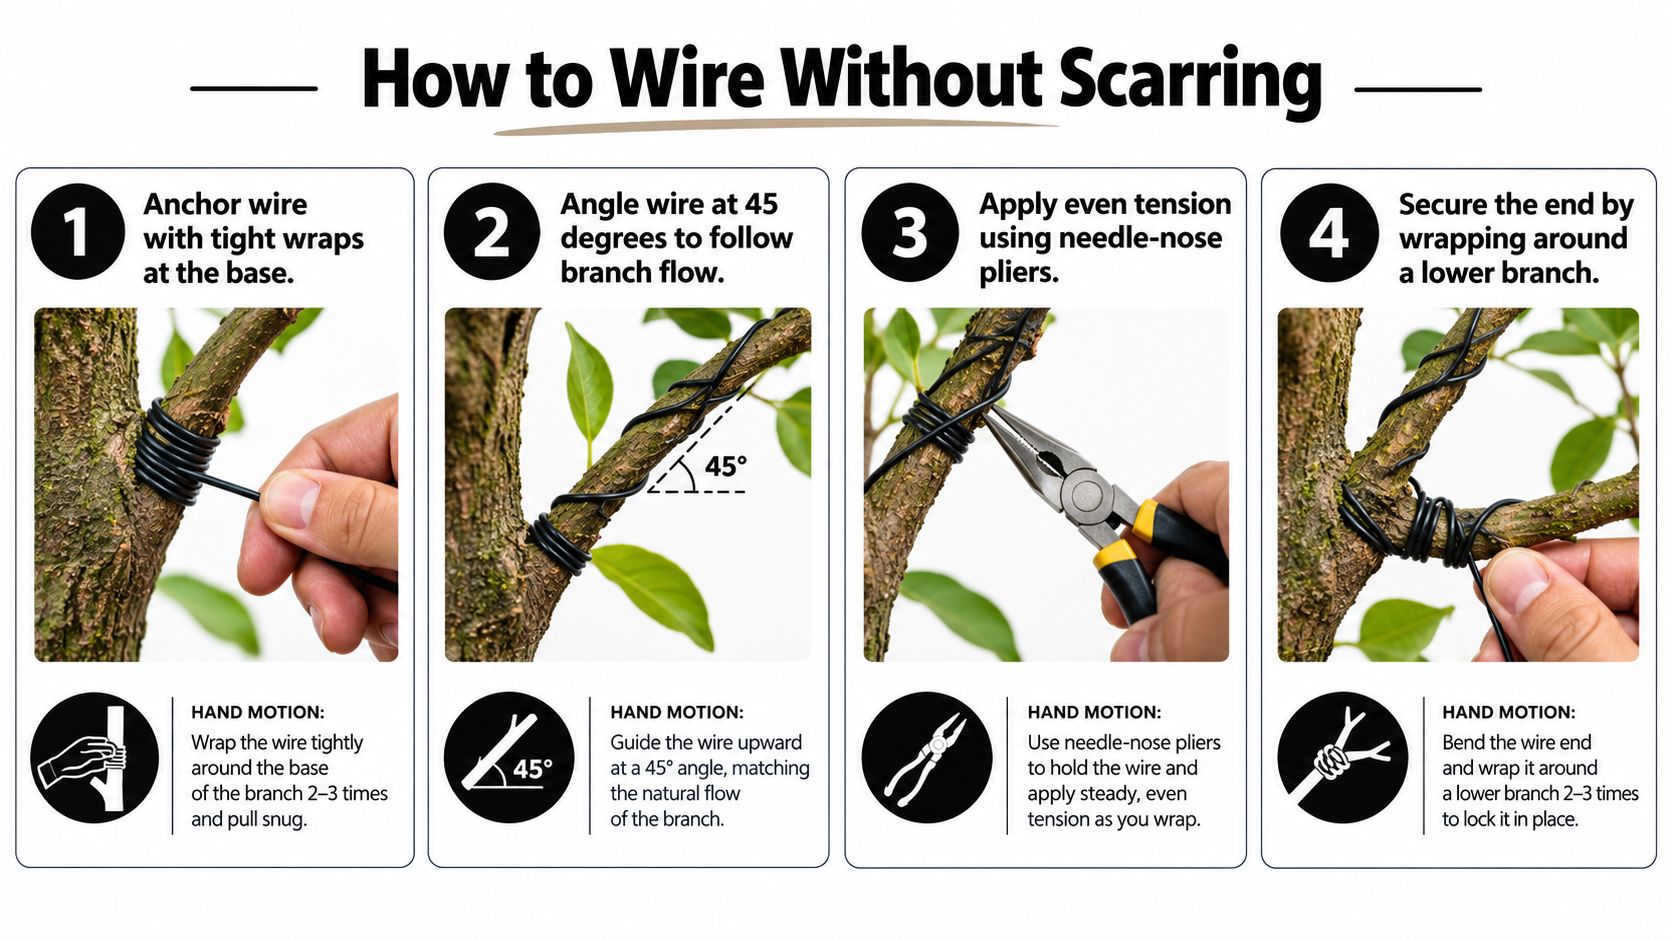
Build the anchor first
Start with one or two firm wraps around the trunk, a nearby branch, or the branch crotch. The anchor prevents the wire from spinning when you bend the branch. Don't tighten it until it cuts into the bark. It needs to resist movement while still allowing you to work smoothly.
Wire the thickest and lowest structural line first. Then work outward and upward. This order lets later wires rest against earlier support rather than pressing across it or crushing a smaller branch.
Keep the spiral at about 45 degrees
Move the wire around the branch in a spiral with each pass crossing at roughly a 45-degree angle. The angle spreads pressure along the branch and gives you a consistent framework for bending. If the angle becomes very shallow, the wire may slide along the bark. If it becomes too steep, the wraps can pinch a narrow area.
Keep the coil snug enough to grip, but loose enough that you can slide a fingertip beneath it. The wire should touch the bark without sinking into it. Leave extra length at the end so you can secure it around a lower branch or cut it cleanly after confirming the placement.
Bend the branch with both hands
Once the wire is in place, grip the branch with both hands. Support the inside of the bend, press the outside of the curve against your thumb, and move the branch gradually. Your hands should guide the movement while the wire maintains the position. Don't yank the tip or make the entire bend in one sharp motion.
For sensitive bark, paper-wrapped wire can reduce surface scuffing on junipers. Raffia strips may add protection around areas where the bark needs extra support, especially near deadwood or shari lines. A single anchor pin from below can stop the wire from spinning when the branch is difficult to secure.
The finished wrap should look like a neat spiral hugging the bark, not a spring floating above the branch and not a tight coil strangling it. Check the branch from several angles. A wire that looks perfect from above may cross awkwardly on the underside or press against a neighboring shoot.
For a visual demonstration of the hand position and wrapping sequence, watch this bonsai wiring video.
After the bend, release the branch slowly. If it springs back, don't just tighten every wrap. Recheck the anchor, consider a paired wire, or reduce the severity of the bend. A controlled first movement protects the branch better than an ambitious correction.
When to Remove Wire and How to Watch for Bite-In
Wire bite-in happens when the branch expands around the wire. The wire doesn't need to “strangle” the branch immediately. The danger comes from leaving it in place while growth creates ridges of bark on either side of each wrap.
The monitoring schedule depends on growth rate, species, wire diameter, temperature, light, and feeding. Public bonsai guidance gives a broad range of three to twelve months, while a separate regional guide notes that fast-growing deciduous trees can mark in as little as six weeks and pines may hold wire for up to twelve months. See this bonsai wiring and pruning guide for the range and the importance of local growing conditions.
Approximate wire-on periods by species and growth rate
| Growth Rate | Common Species | Typical Wire-On Period | Bite-In Risk Window |
|---|---|---|---|
| Fast | Deciduous trees in active growth | As little as 6 weeks | Inspect frequently once new swelling appears |
| Moderate | Many maples and elms | Several weeks to a few months | Risk rises during strong flushes of growth |
| Slow | Junipers and pines | Several months, sometimes up to 12 months | Lower urgency, but inspect every wrap |
These ranges are monitoring guides, not permission to leave wire unattended. A warm indoor position, strong light, and active feeding can accelerate growth. A tree kept in cooler or dimmer conditions may grow more slowly, but you should still look at the wire rather than relying on the calendar.
Use a short inspection routine
Every check can take only a few seconds. Look for:
- Wire pressing into bark: The groove is becoming deeper rather than remaining a surface impression.
- Swelling beside the wrap: Tissue rising on one or both sides signals that the branch is growing around the wire.
- Color or texture changes: Bark may look stretched, pinched, or unusually raised.
- Wire movement: A loose wire can stop controlling the branch and rub the bark during movement.
Thicker wire isn't automatically safer because it lasts longer. A larger gauge can create stronger localized pressure, and a fast-growing branch may mark before the branch has fully set. Choose enough strength for the bend, then inspect according to the tree's growth speed.
Remove wire without unwinding it
When the wire begins to mark the bark, use bonsai wire cutters or small flush cutters to cut the coil into manageable pieces. Remove each piece away from the branch. Don't unwind a tight wire from a set branch, because the twisting motion can tear bark or snap a tender shoot.
Remove the wire only when the branch has retained enough of its position. If it springs back immediately, the branch may need another wiring cycle or a guy wire for support. Once removed, give the tree gentle aftercare and avoid treating the new position as permanent. Living branches may need repeated training as they thicken.
Common Wiring Mistakes and Misconceptions
The first mistake is treating every mark as an emergency. A light surface impression doesn't mean the branch has been ruined, and wire doesn't cause severe damage within hours. The core problem is a wire left in place while the branch continues swelling through its risk window.
A second mistake is treating copper as universally better. Copper holds resistant bends strongly, but aluminum is often more forgiving for deciduous and tropical material. The best material depends on the branch's resistance, bark sensitivity, and the precision you can maintain while wrapping.
Five ideas worth correcting
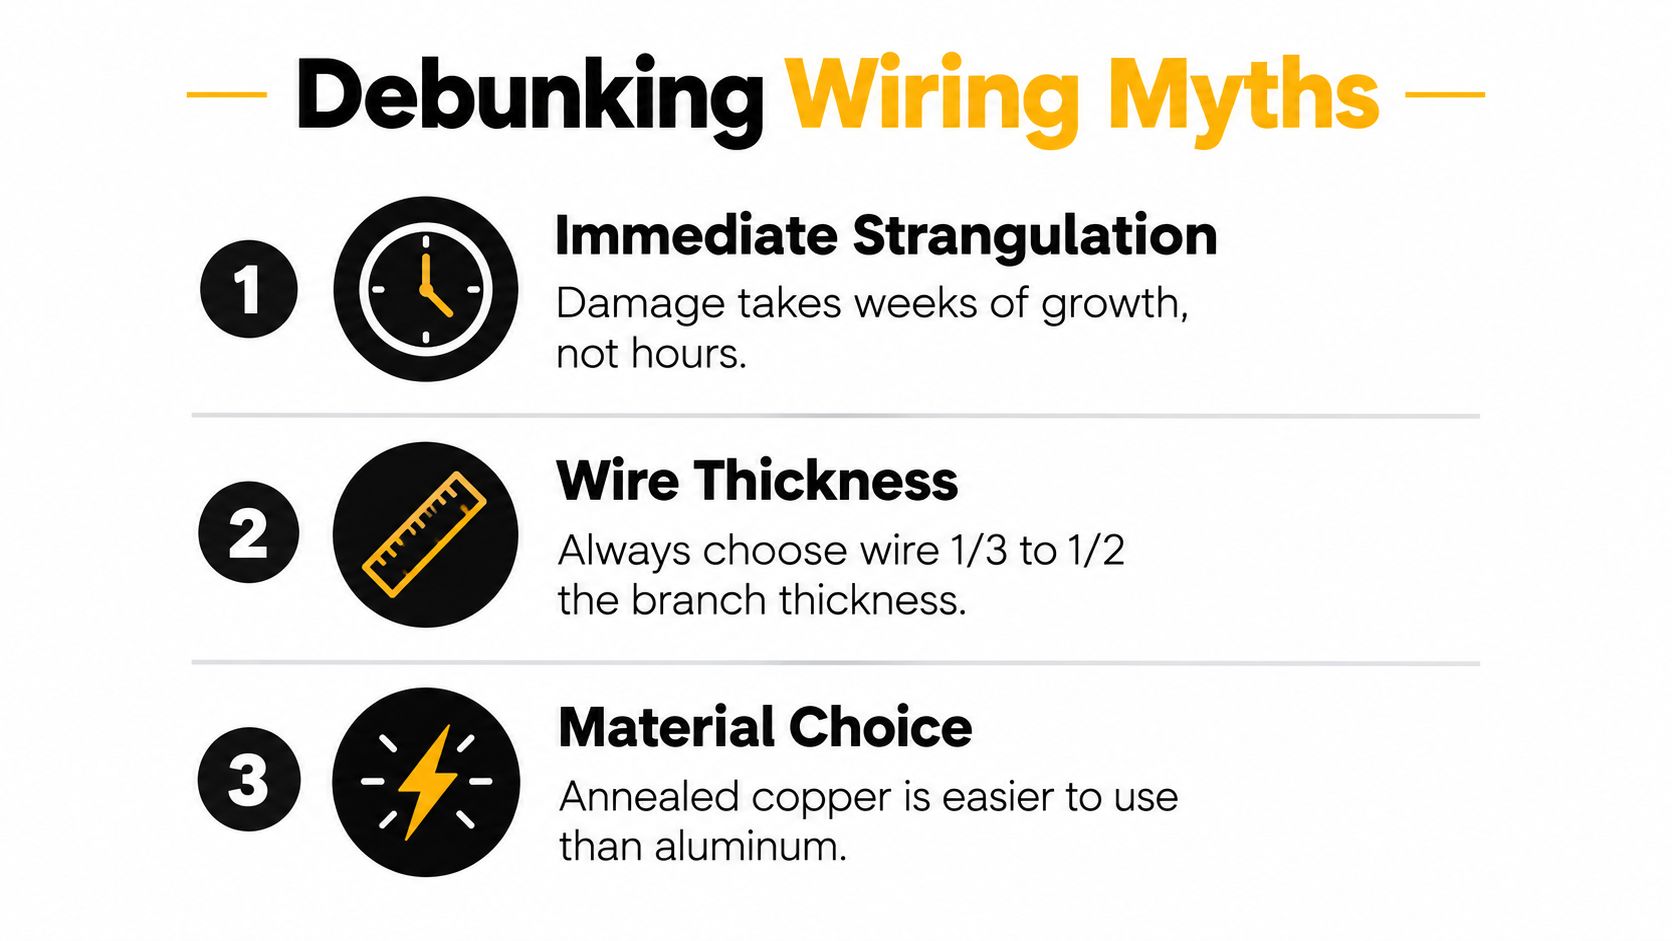
- “Wire strangles branches immediately.” Damage develops as growth presses against the coil. That's why a watch schedule matters more than panic after a single missed day.
- “Copper is always better.” Copper is useful when holding power matters, but aluminum may be easier to place on flexible or sensitive branches.
- “Beginners should never use copper.” A beginner working on a pine or juniper can benefit from copper once they understand anchoring, angle, and pressure.
- “Thicker wire is safer.” Oversized wire can press more in and may be harder to remove. The smallest effective gauge is usually the more controlled choice.
- “Wire stays until the branch sets forever.” Wire is temporary. A branch may require repeated training over time, but leaving permanent wire on living tissue isn't the goal.
Another common error is trying to correct too much at once. A branch that needs a gradual change may split when forced into a dramatic curve. Use wire to create a measured position, then allow the tree to respond before asking for another adjustment.
Don't judge success by how tight the coil looks. Judge it by whether the branch stays where you placed it without crushed bark, sliding wire, or sharp kinks. A neat, moderate wrap is more useful than an aggressive one that leaves a permanent scar.
Buying the Right Bonsai Wire for Your Collection
A branch is ready for wiring, but your collection has only one coil left. Before buying another, check the product label rather than choosing by coil color. Look for the material, diameter in millimeters, and whether the wire is annealed or otherwise prepared for bonsai work. The listing should identify anodized aluminum, bare copper, pre-cut lengths, or a continuous coil.
Use a shopping checklist
- Material: Choose annealed aluminum for easy handling, or copper when a branch needs greater holding strength.
- Diameter: Use the millimeter measurement, not a gauge number alone.
- Coil length: Check how much wire the package contains before comparing prices or quantities.
- Surface finish: The listing should clearly describe an anodized or bare finish.
- Temper: Look for consistent softness. Sections that alternate between pliable and springy are difficult to control.
- Storage: Keep coils dry, separated by diameter, and organized so the correct size is ready before you start.
A starter collection works better with several complementary sizes than with one enormous roll. Shoots, secondary branches, and structural limbs behave differently, much like thin twigs and sturdy stems require different supports. Common aluminum sizes include 1.5 mm, 2 mm, 3 mm, 4 mm, and 5 mm. If you can buy only three, choose 2 mm, 3 mm, and 4 mm to cover a useful range of small and medium branches.
Choose the assortment by branch behavior and growth rate, not species name alone. A fast-growing ficus branch may need more frequent checks because it thickens quickly. A slower, firmer branch may hold its position longer, while a flexible shoot can need a lighter wire that bends without forcing it. Mixed collections therefore benefit from several workable diameters rather than one size chosen for the heaviest trunk.
Read product descriptions critically
Be cautious when a listing gives only a gauge number without its millimeter conversion. Vague alloy descriptions, flaking coatings, and uneven temper make wire harder to assess and use. Good wire bends predictably, forms a clean spiral, and cuts without excessive deformation.
A kit can simplify the first purchase if it offers several diameters together. The Leaves & Soul bonsai tree wire kit is described as containing aluminum alloy wire in several sizes for repositioning and training branches. Treat a kit as a starting point, then add sizes according to the branches you train.
Before checking out, match the wire to your next project. The smallest diameter that holds the branch is usually easier to place, adjust, and remove. Plan a watch schedule at the same time: inspect fast-growing branches weekly, and check slower branches every two weeks. A suitable purchase includes enough strength for the bend and enough flexibility to protect the bark.
Leaves & Soul offers bonsai accessories, wiring kits, soils, fertilizers, and starter sets for indoor and outdoor growers. Visit Leaves & Soul for tools and growing supplies.